Overview
This guide explains how to connect QuickBooks with Exsited for seamless financial and operational management.
Integrating the two systems enables you to:
- Automate the flow of data between finance and operations
- Eliminate double entry and reduce errors
- Gain real-time insights into cash flow and performance
- Save time with intelligent syncing
- Maintain accurate, audit-ready records
This guide is designed for:
- System Administrators configuring integrations
- Finance Managers managing accounts and compliance
- Consultants and Engineers supporting digital transformation
Follow the step-by-step instructions to set up or refine your QuickBooks–Exsited connection for accurate, efficient, and scalable business operations.
Set Up Organisation in QuickBooks
- Add a new organisation.
- Screenshot showing the company setup form where a new QuickBooks organisation is created.
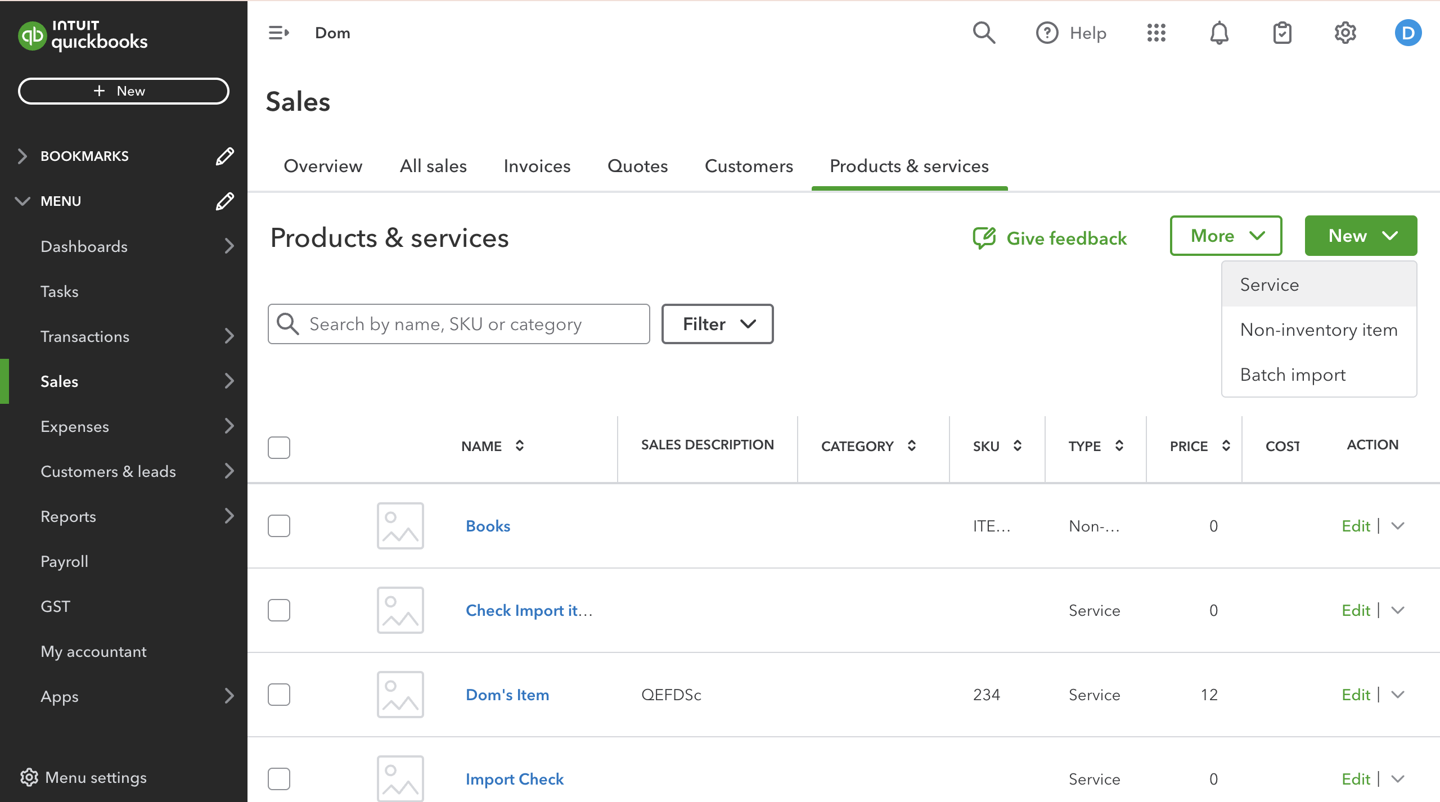
Add Inventory Items in QuickBooks
Navigation: Sales > Products and Services > New
- Add:
- Item Code
- Item Name
- Unit Price
- Assign accounts:
- Inventory Asset Account
- Sales (Income) Account
Interface for defining new inventory items in QuickBooks, including account mappings.
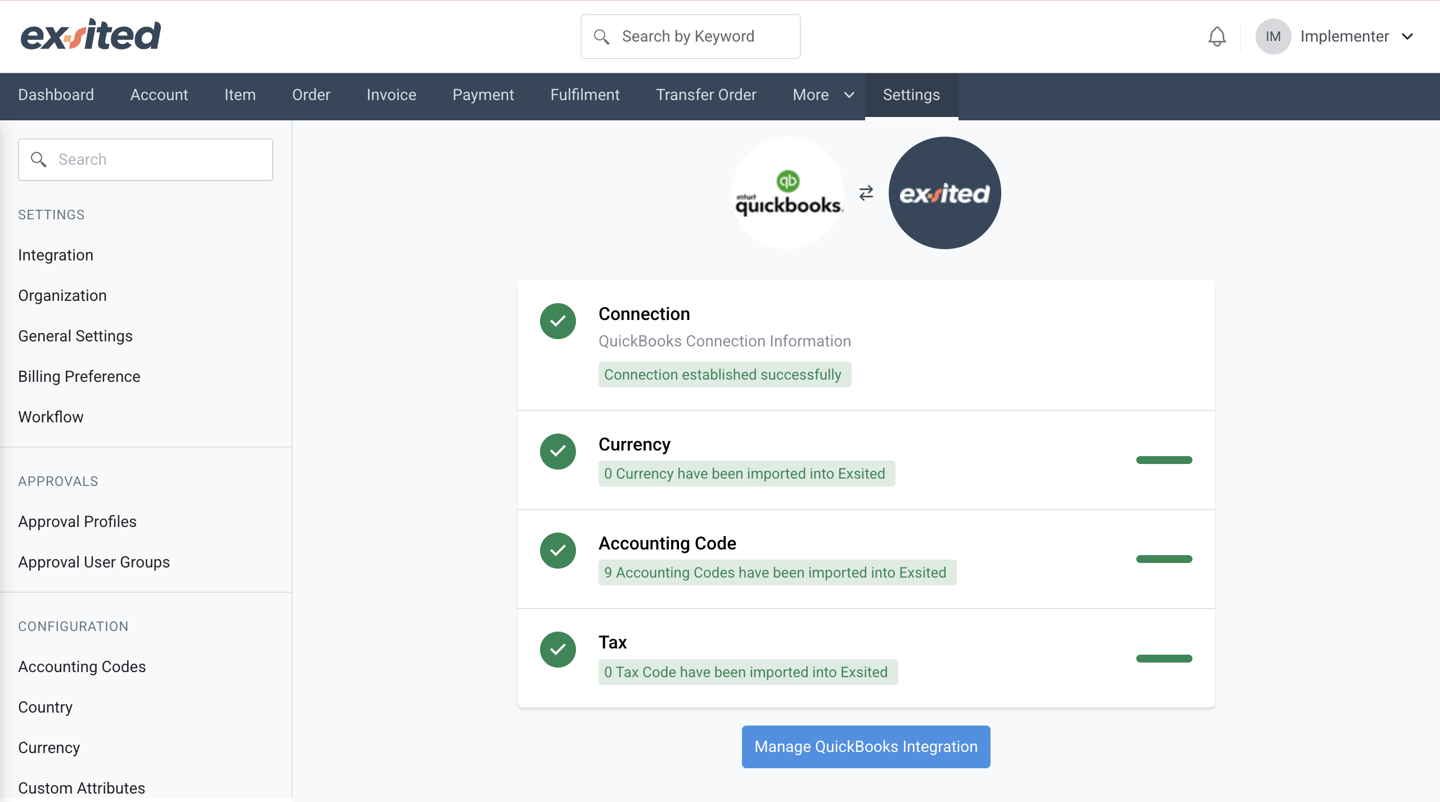
Connect Exsited to QuickBooks
Navigation: Exsited > Settings > Integrations > Add Integration
- Select QuickBooks and click Connect
- Log in to QuickBooks and authorise access
- Choose the correct organisation
- Exsited will fetch:
- Account codes
- Tax codes
- Currency details
Visual confirmation of successful integration between Exsited and QuickBooks.
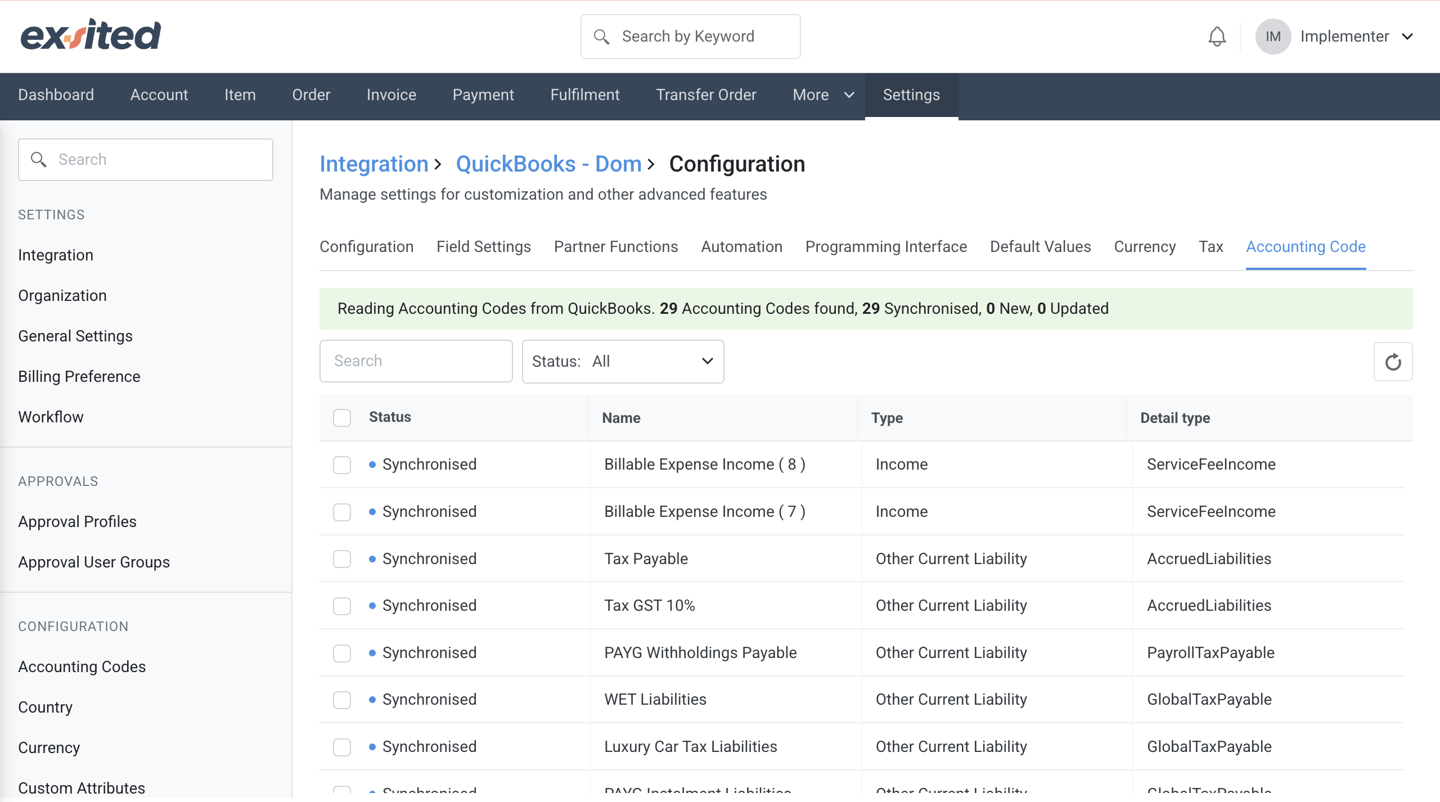
Configuration
Account Configuration
Navigation: Exsited > Integrations > QuickBooks > Configuration
The Account Configuration screen within Exsited allows users to manage how account-related data is both exported to and imported from QuickBooks, ensuring seamless two-way integration between the systems. This configuration interface provides options to turn sync functionality on or off, set default accounting codes, and map account and tax codes between Exsited and QuickBooks.
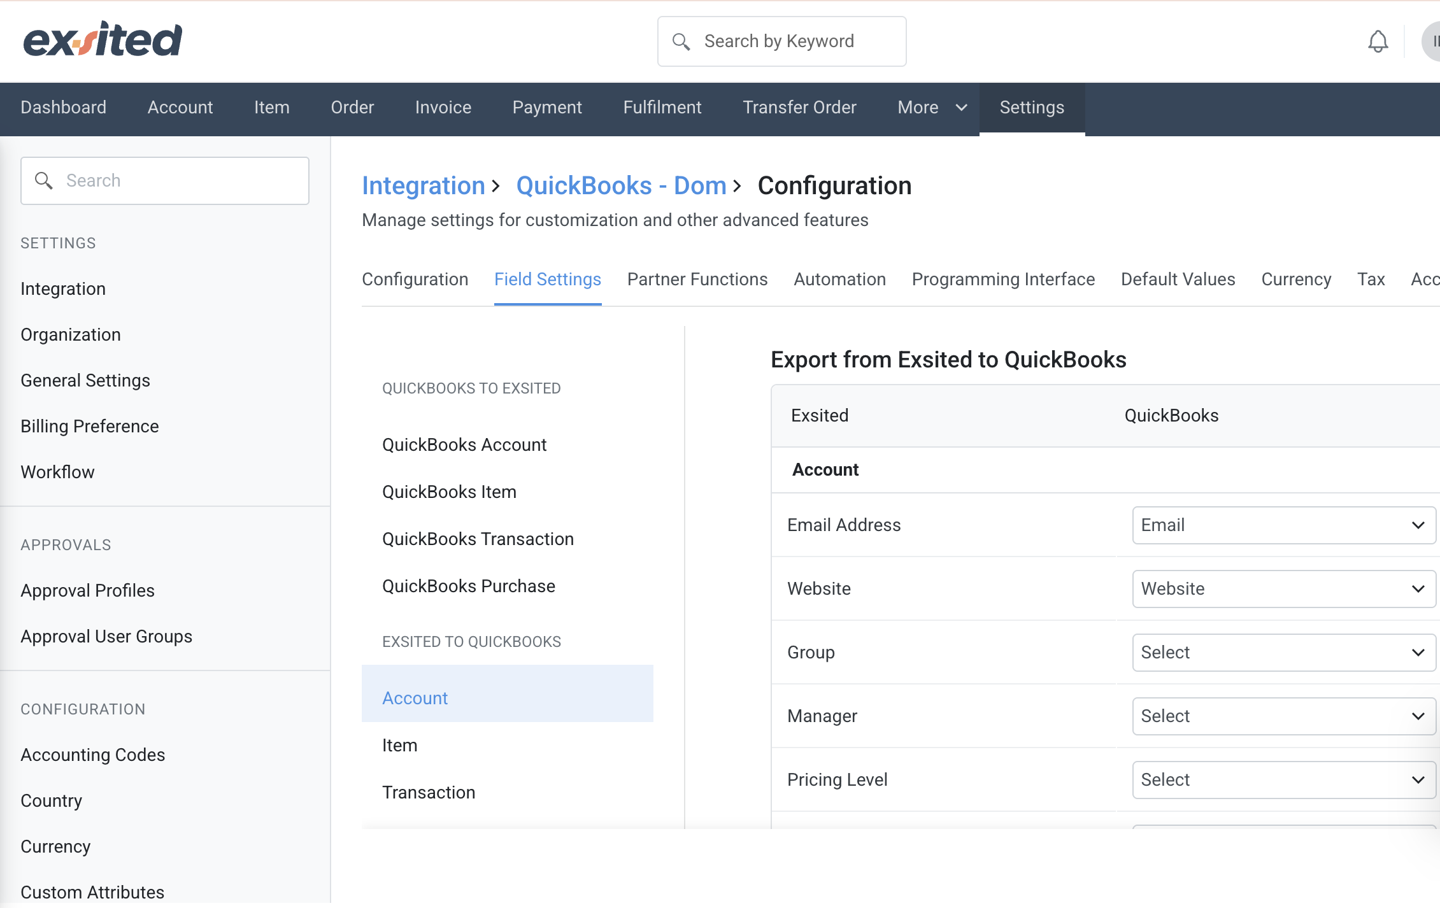
When exporting, users can define the default accounting code for receivables and map Exsited account codes to corresponding accounts in QuickBooks. This ensures that financial transactions such as invoices and payments are correctly posted in both systems.
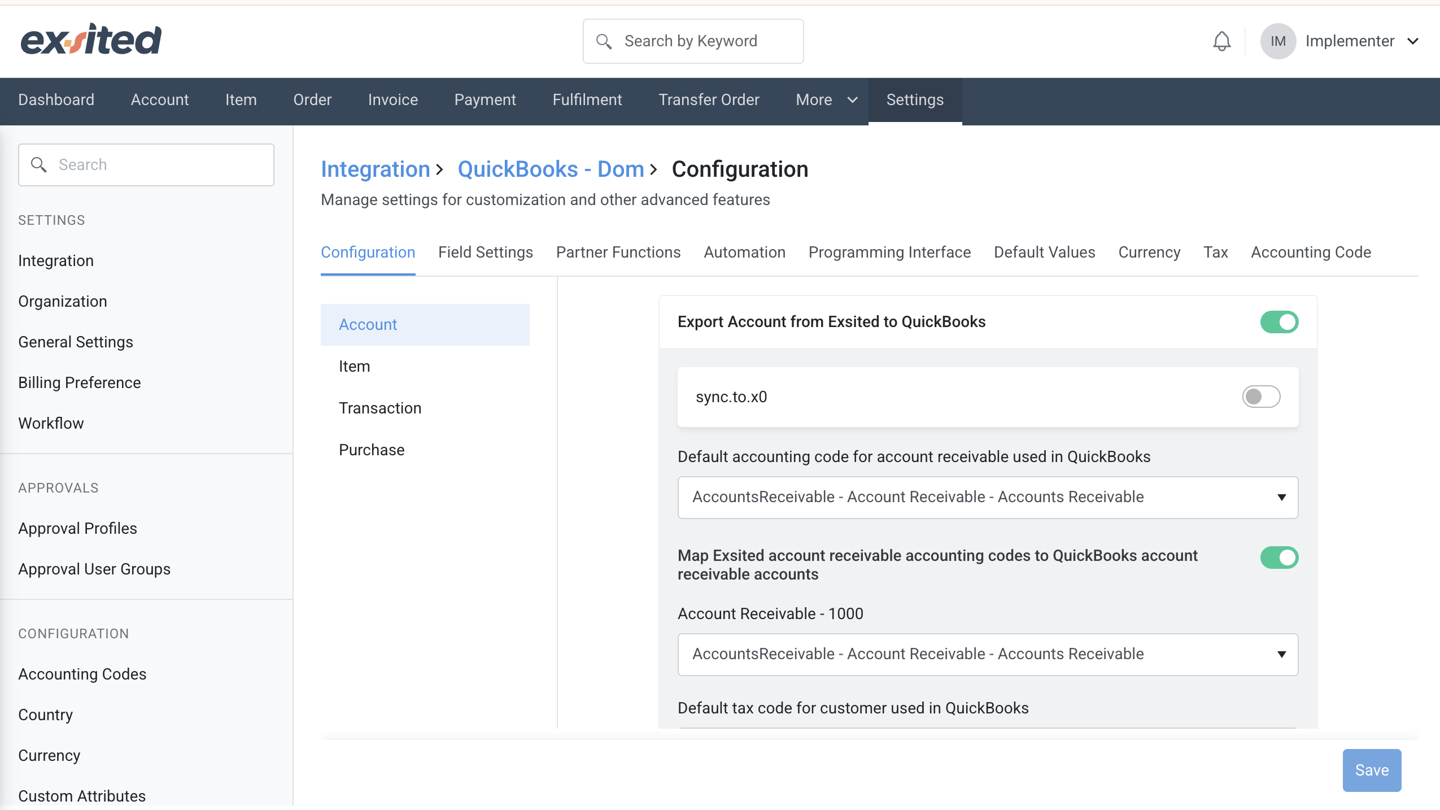
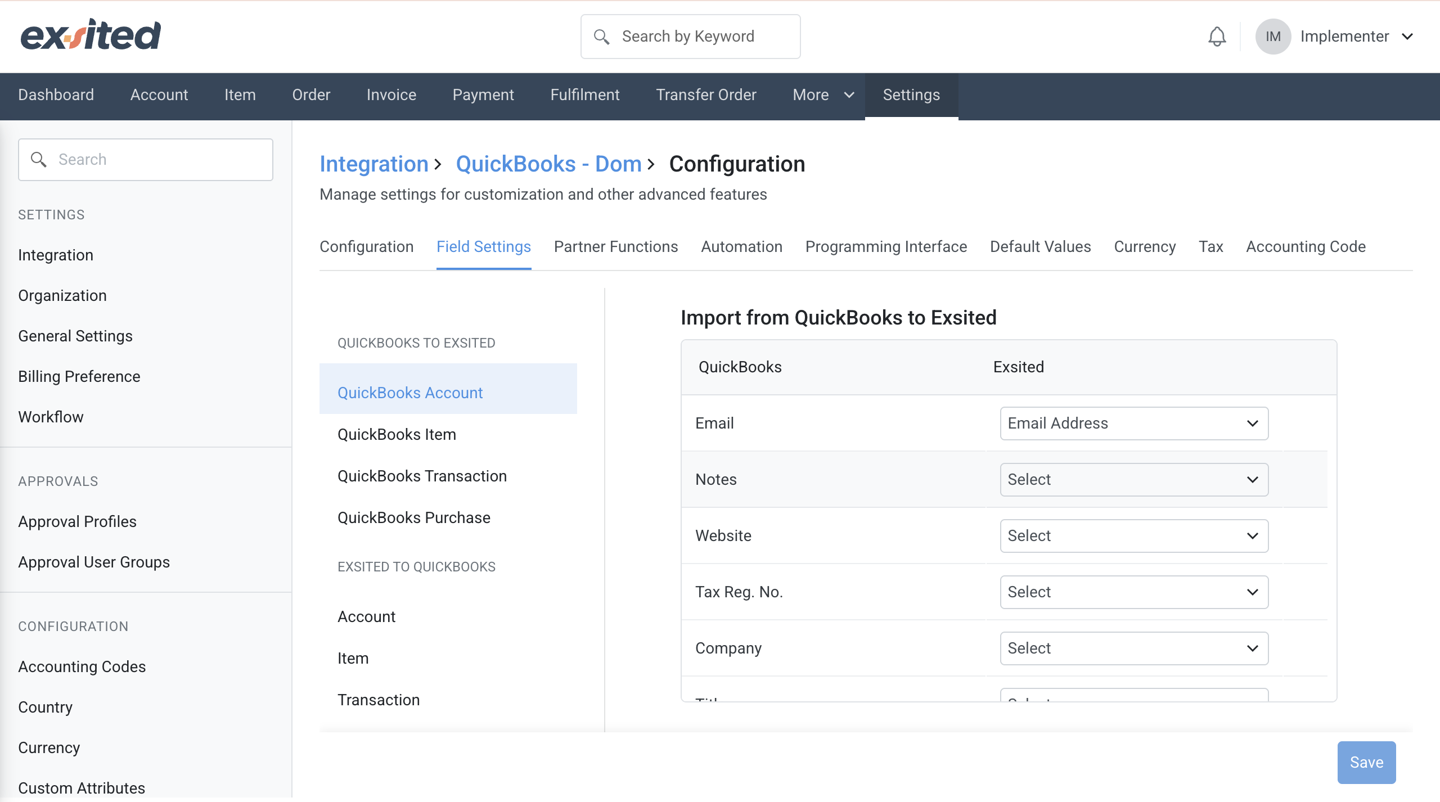
For importing, users can configure the system to pull account-related data from QuickBooks into Exsited, including accounts receivable, tax codes, and other financial attributes. The import setup also allows mapping of QuickBooks tax codes to Exsited tax codes, and lets users specify which field should be used as the Account ID in Exsited (e.g., “Assigned by Exsited”).
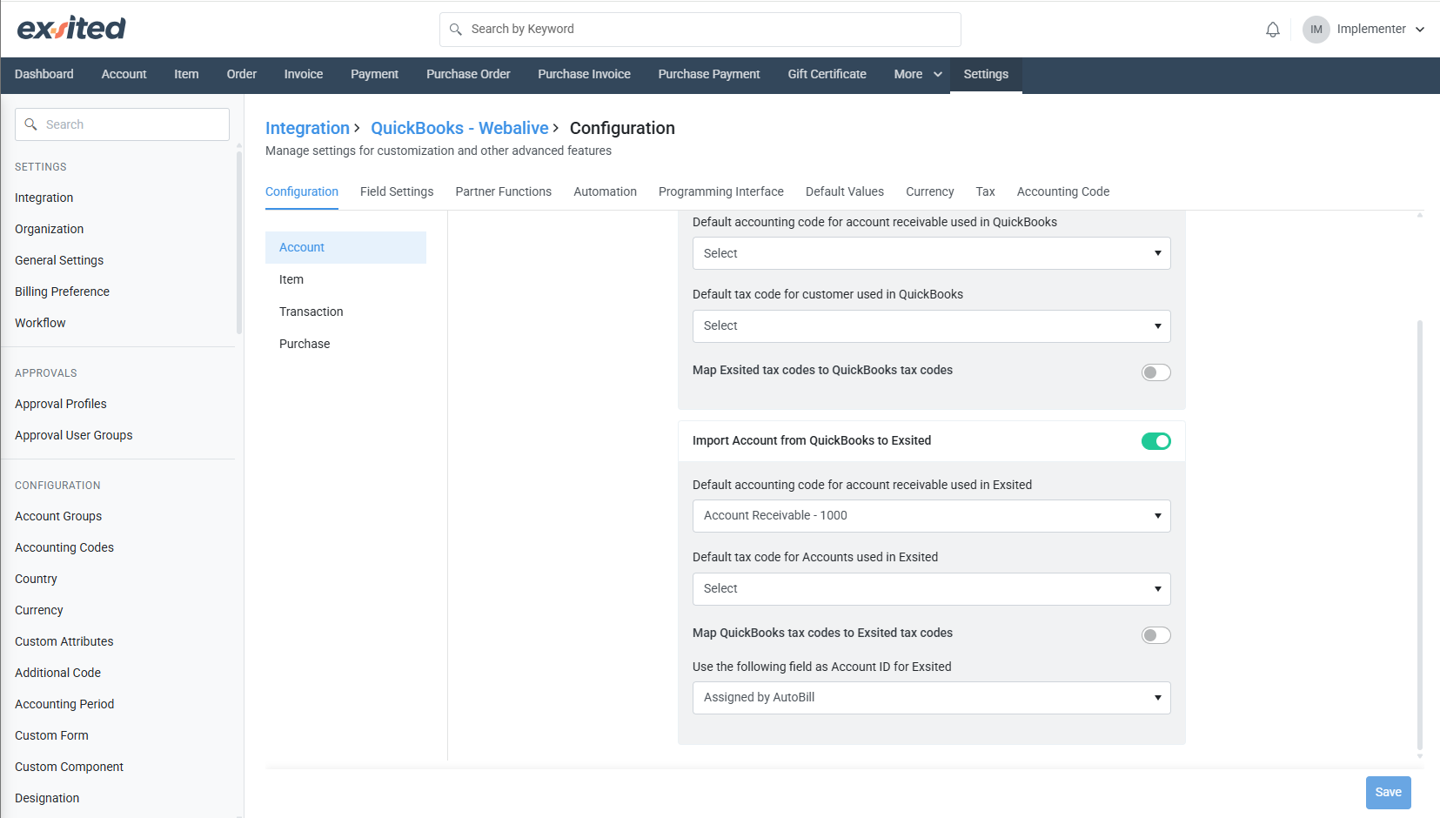
By aligning account and tax data across both platforms, this configuration supports accurate financial reporting, improves tax compliance, and reduces manual effort during integration.
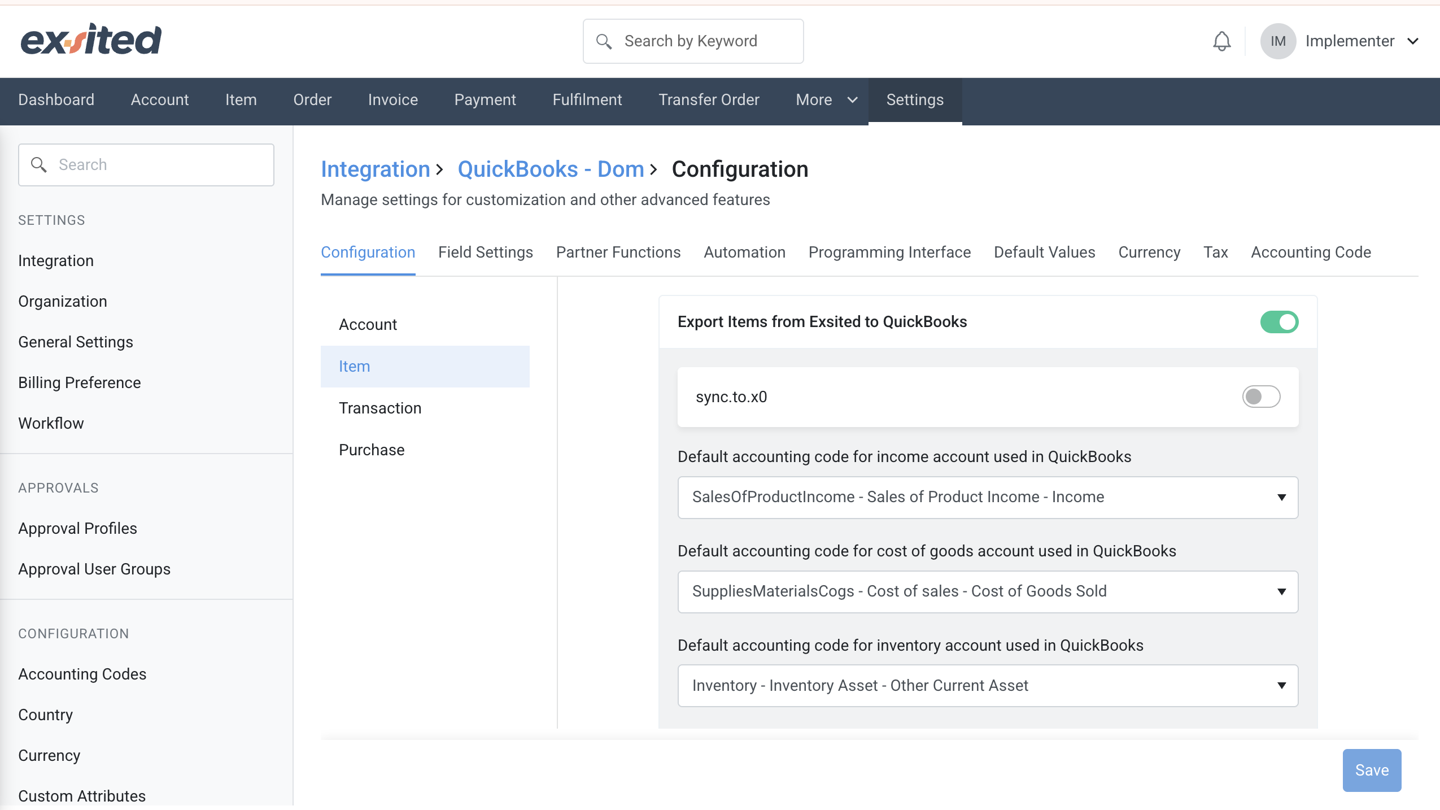
Item Configuration
Navigation: Exsited > Integrations > QuickBooks > Configuration
The Item Configuration screen within Exsited enables users to manage how product or inventory-related data is both exported to and imported from QuickBooks, ensuring accurate financial and inventory alignment between systems.
When exporting from Exsited to QuickBooks, users can configure default accounting codes for income (sales), cost of goods sold (COGS), and inventory valuation. These mappings ensure that each item exported from Exsited is accurately categorised under the appropriate account types in QuickBooks. Additionally, users can define default tax codes for both taxable and tax-exempt items and optionally enable the mapping of Exsited inventory codes to QuickBooks inventory accounts and tax codes.
On the import side, Exsited supports pulling item data from QuickBooks into Exsited. This includes setting default accounts for sales revenue, COGS, and inventory valuation within Exsited. Users can also configure default tax codes for taxable and exempt rates, map QuickBooks tax codes to Exsited tax codes, and specify a default warehouse for inventory tracking. This warehouse linkage ensures that inventory quantities, costs, and location-based data are accurately maintained across all platforms.
Together, these import and export configurations support synchronised item data, reduce manual effort, and promote consistent and accurate reporting between Exsited and QuickBooks.
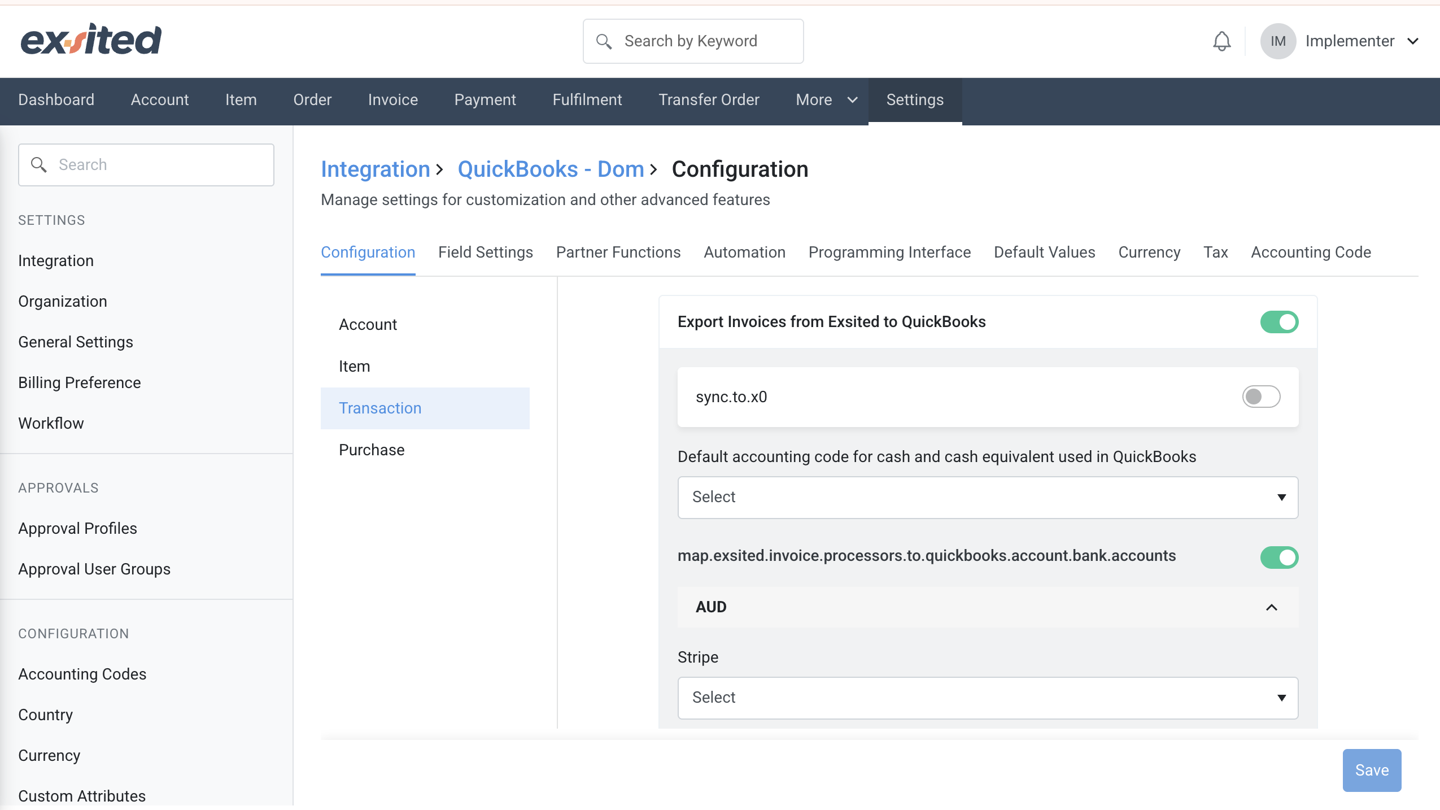
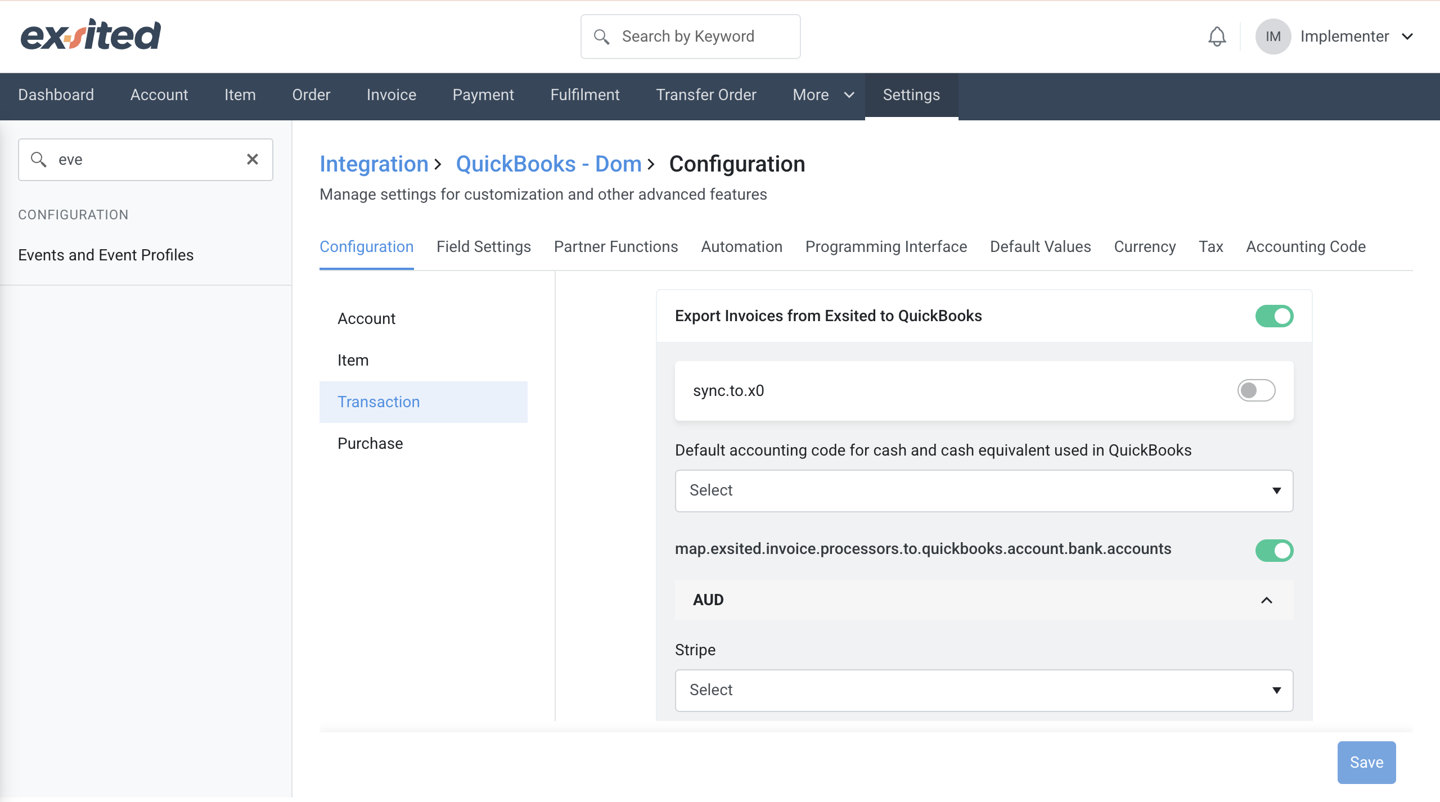
Transaction Configuration
Navigation: Exsited > Integrations > QuickBooks > Configuration
The Transaction Configuration screen in Exsited provides comprehensive options for managing the synchronisation of invoices and payments between Exsited and QuickBooks. It supports four key processes: exporting invoices, exporting payments, importing invoices, and importing payments, giving businesses full control over their financial data integration.
Export Invoices from Exsited to QuickBooks
This section allows users to:
- Enable or disable invoice exports.
- Define the default accounting code for cash and cash equivalents in QuickBooks.
- Map payment processors (e.g., Stripe, Bank Deposit, Cheque, Cash) to corresponding QuickBooks bank accounts for accurate reconciliation.
- Specify default tax codes for taxable and tax-exempt invoices.
- Map Exsited tax codes to QuickBooks tax codes.
- Set default values for customers and items used during invoice export.
- Assign specific item codes for shipping.
- Choose the field used as the invoice number in QuickBooks.
Export Payments from Exsited to QuickBooks
This section allows users to:
- Enable or disable payment exports.
- Define the default accounting code for cash and cash equivalents in QuickBooks.
- Specify the field to be used as the Payment Number for QuickBooks.
- Specify the field to be used as the Credit Note Number for QuickBooks.
- Specify the field to be used as the Refund Number for QuickBooks.
Import Invoices from QuickBooks to Exsited
This section supports:
- Enabling or disabling invoice imports.
- Defining the default accounting code for sales revenue in Exsited.
- Setting default tax codes for taxable and tax-exempt rates.
- Optionally mapping QuickBooks tax codes to Exsited tax codes.
- Setting default account and item codes for imported invoices.
- Specifying item codes for shipping and selecting a discount profile.
- Choosing the field used as the invoice ID in Exsited.
Import Payments from QuickBooks to Exsited
This section supports:
- Enabling or disabling payment imports.
- Setting a default accounting code for cash and cash equivalents in Exsited.
- Mapping QuickBooks Online bank accounts to Exsited payment processors (optional).
- Choosing fields to be used as Payment ID, Credit Note ID, and Refund ID in Exsited, typically assigned by Exsited.
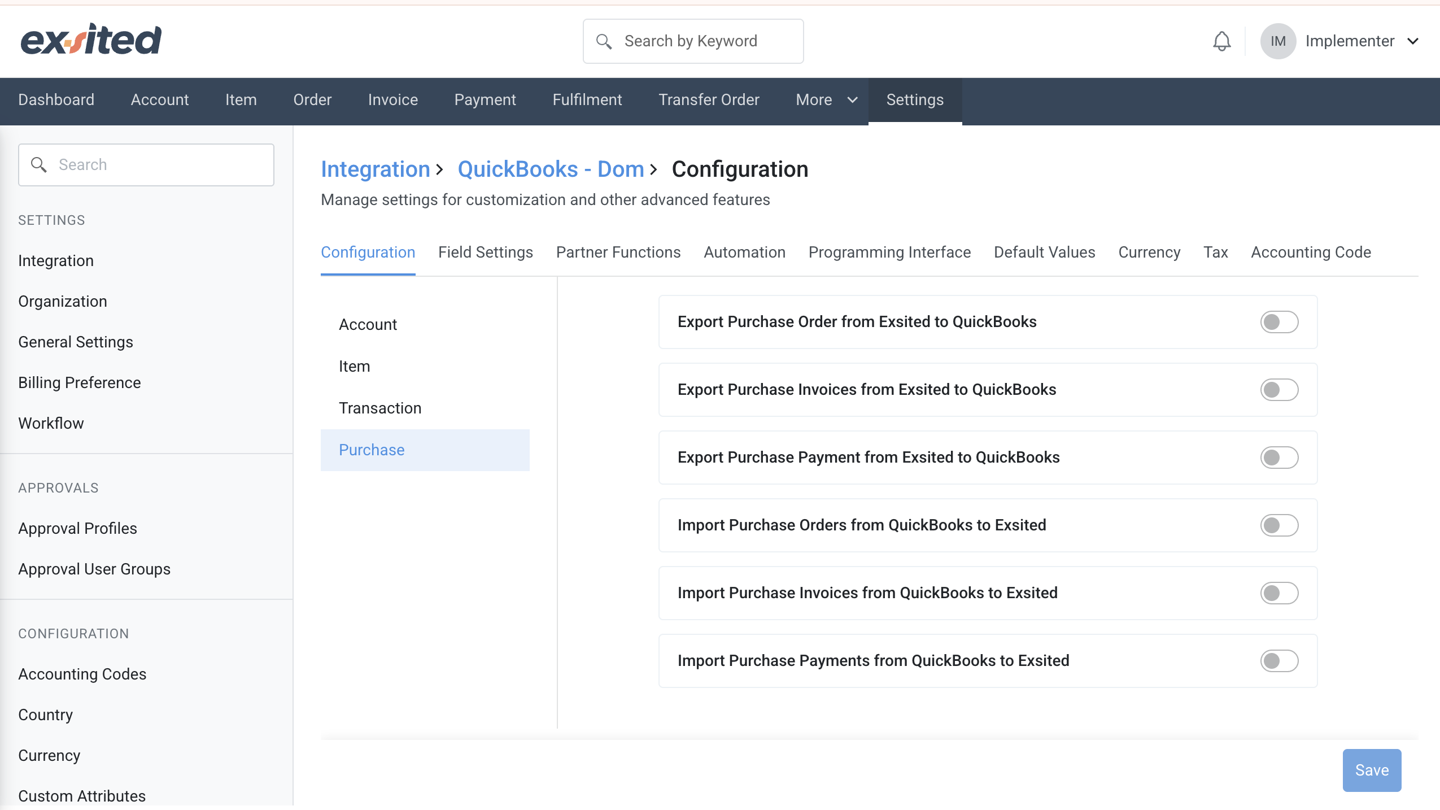
Purchase Configuration
Navigation: Exsited > Integrations > QuickBooks > Configuration
The Purchase Configuration interface offers complete control over how purchase-related transactions, such as purchase orders, invoices, and payments, are exchanged between Exsited and QuickBooks. Each transaction type can be independently enabled or disabled for import (from QuickBooks to Exsited) and export (from Exsited to QuickBooks), allowing businesses to manage data flows with precision.
This flexibility empowers organisations to customise automation workflows by ensuring only validated and approved transactions are synchronised. Whether importing purchase invoices or exporting payments, companies can selectively activate processes to match their readiness.
Ideal for businesses adopting automation gradually, the interface supports phased implementation, starting with importing critical data, then enabling exports after internal validation. As a central control hub, Purchase Configuration improves data accuracy, streamlines workflows, and simplifies transaction management across both platforms.
Field Settings Configuration
Navigation: Exsited > Integration > Field Settings
- Choose sync direction:
QuickBooks → Exsited(for item, customer, invoice import)Exsited → QuickBooks(for sales, items export)
- Map fields like customer name, contact email, and account code.
Field mapping screen where users align contact fields across platforms.
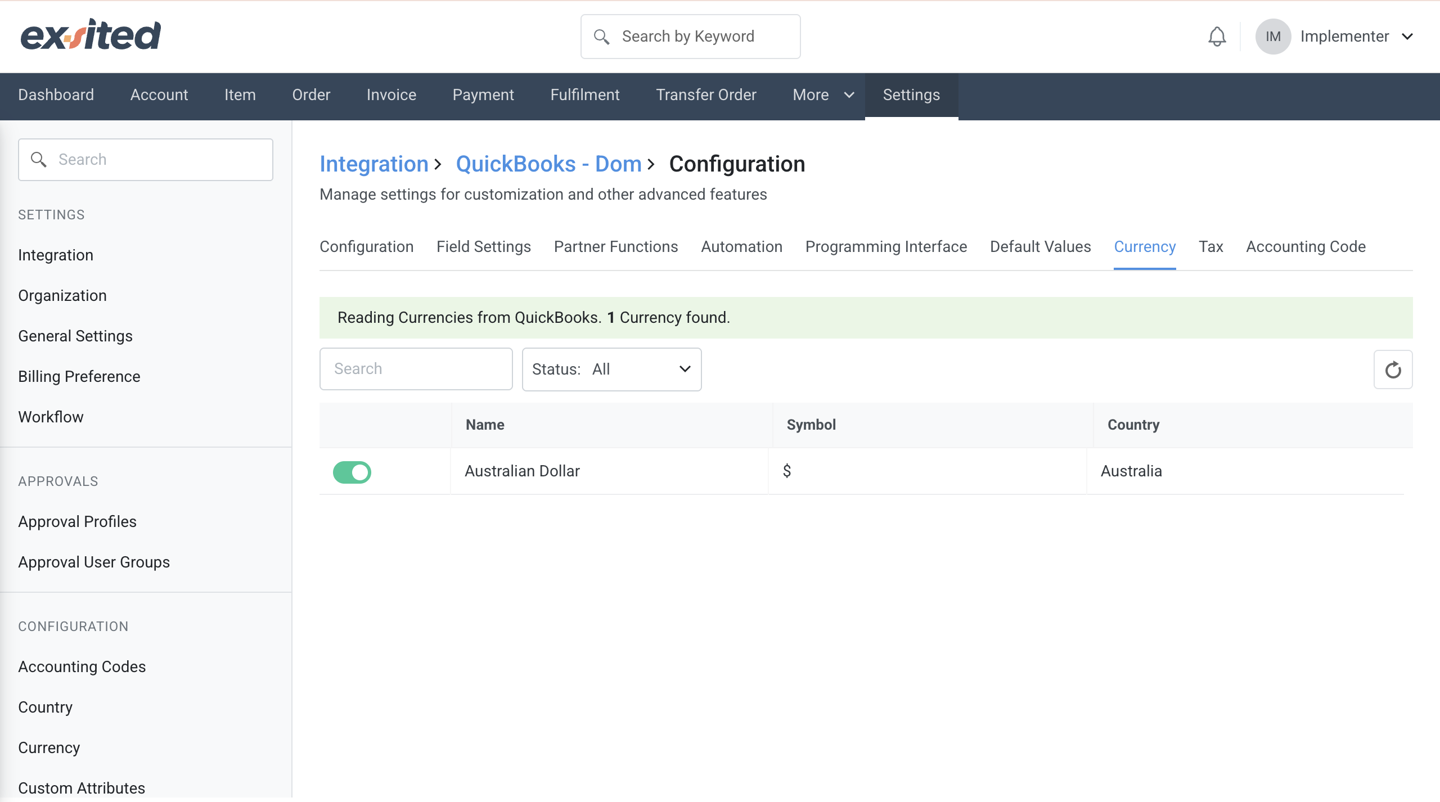
Currency Configuration
Navigation: Exsited > Settings > Currency
- Enable multi-currency if QuickBooks uses multiple currencies
- Ensure exchange rates apply during invoice imports
Activate currencies such as AUD, USD, etc., for accurate accounting.
Set Up Tax and Account Codes
Navigation: Exsited > Integrations > QuickBooks > Configuration
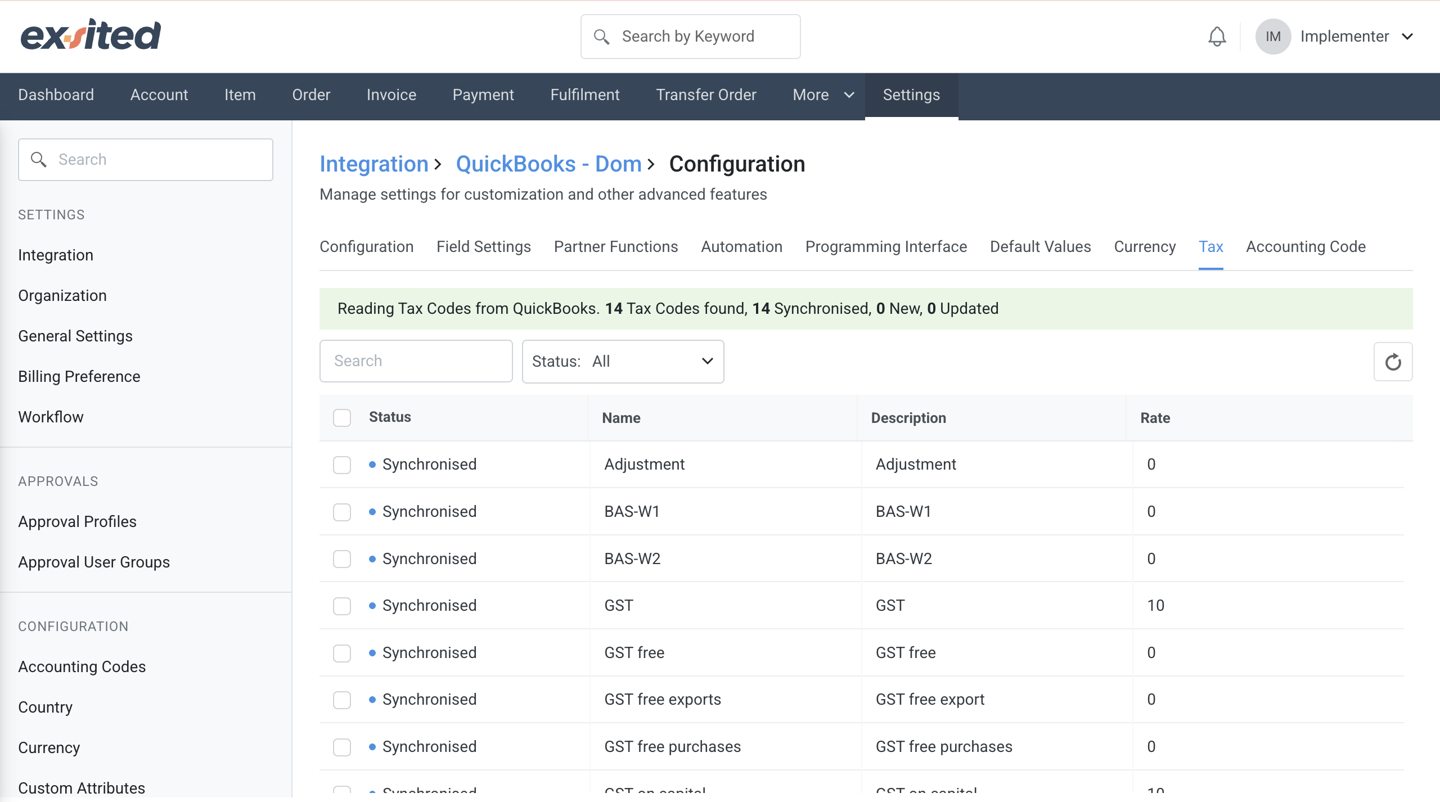
- Match Exsited tax rates with QuickBooks tax codes
- Set default account codes for transactions
Configure the mapping of tax and general ledger accounts between systems.
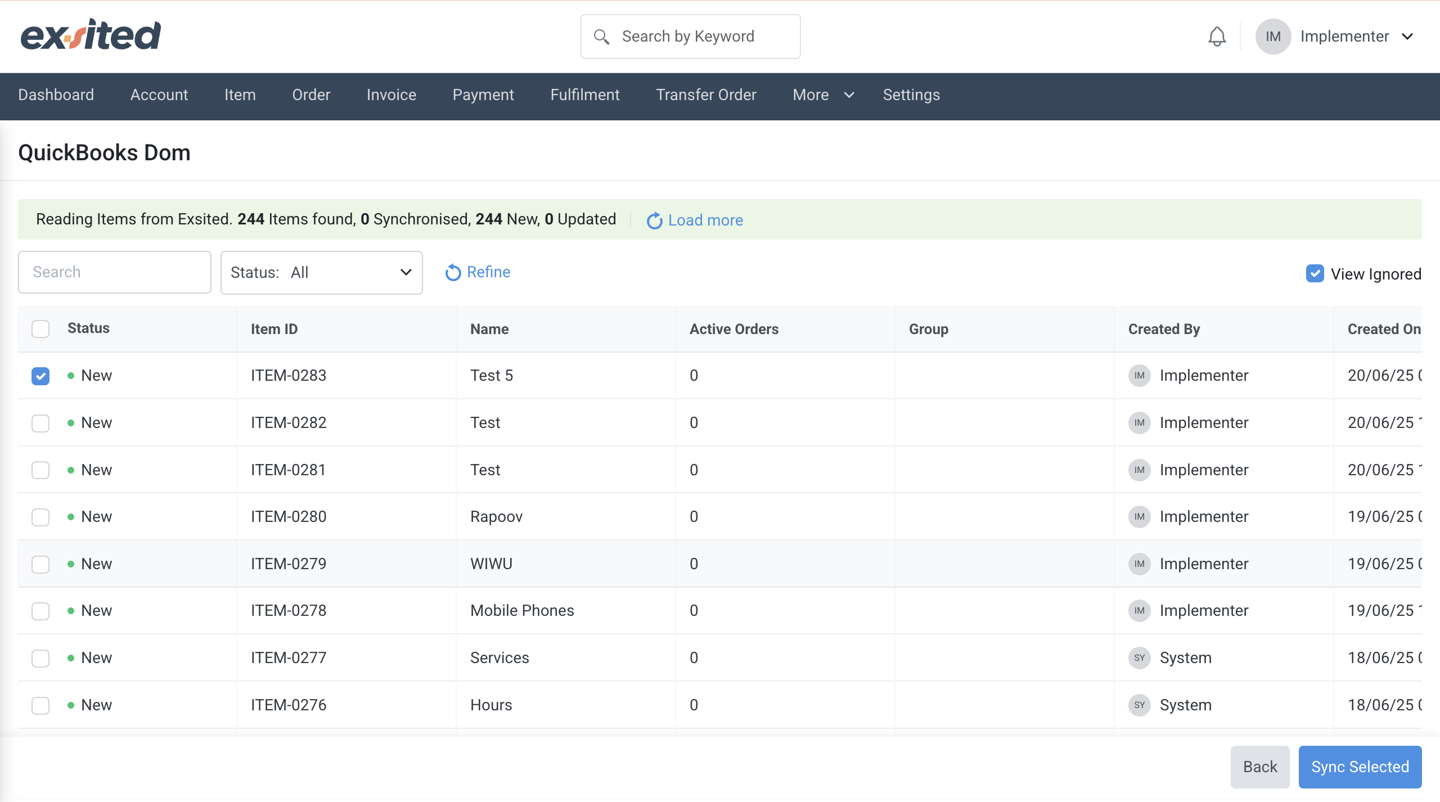
Item Synchronisation
Import Items from QuickBooks to Exsited
Navigation: More > QuickBooks > Import Items
Item sync screen showing item names, codes, and mapping status.
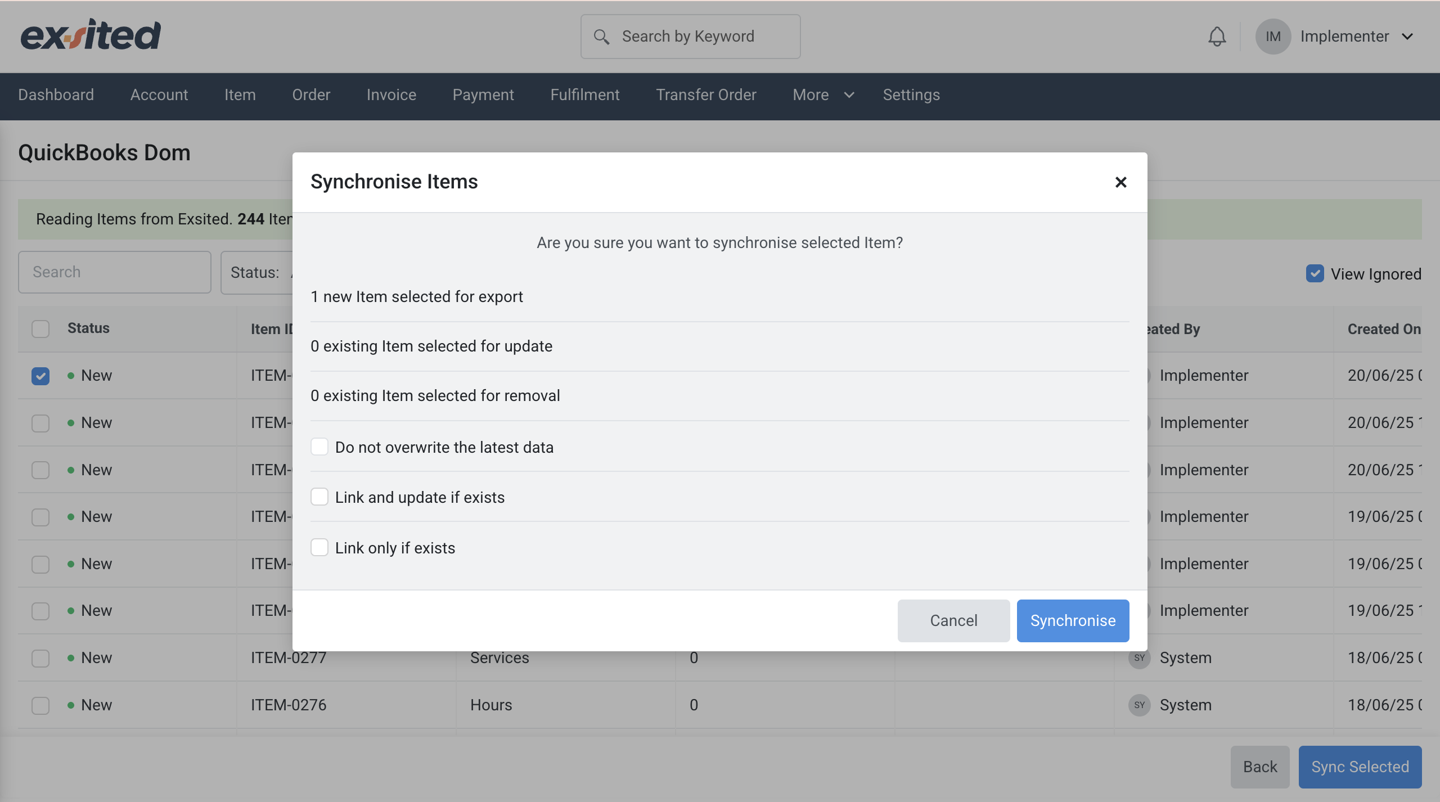
1. Choose the QuickBooks organisation, then click New

2. Select items to Import
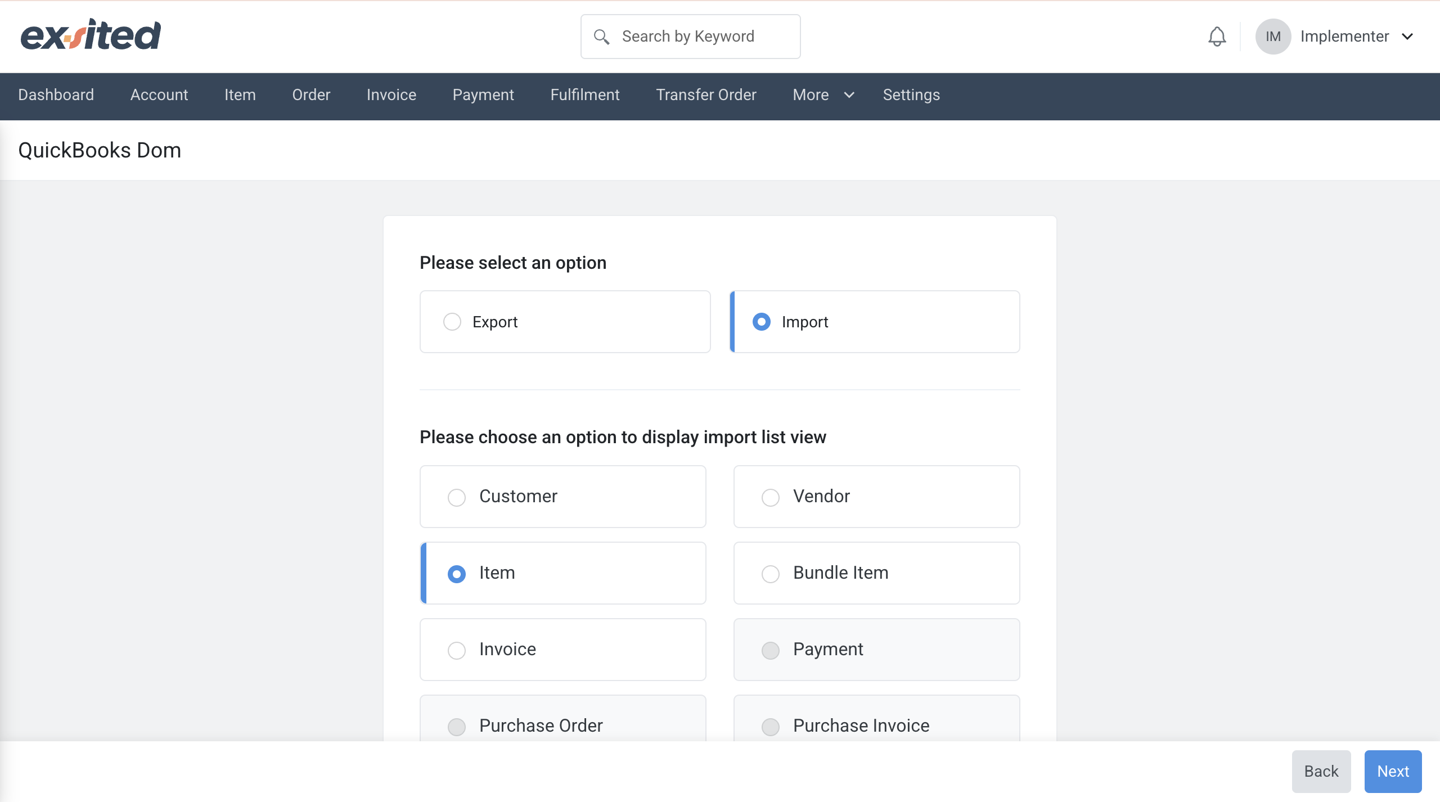
3. Choose the item type to import: New or other options
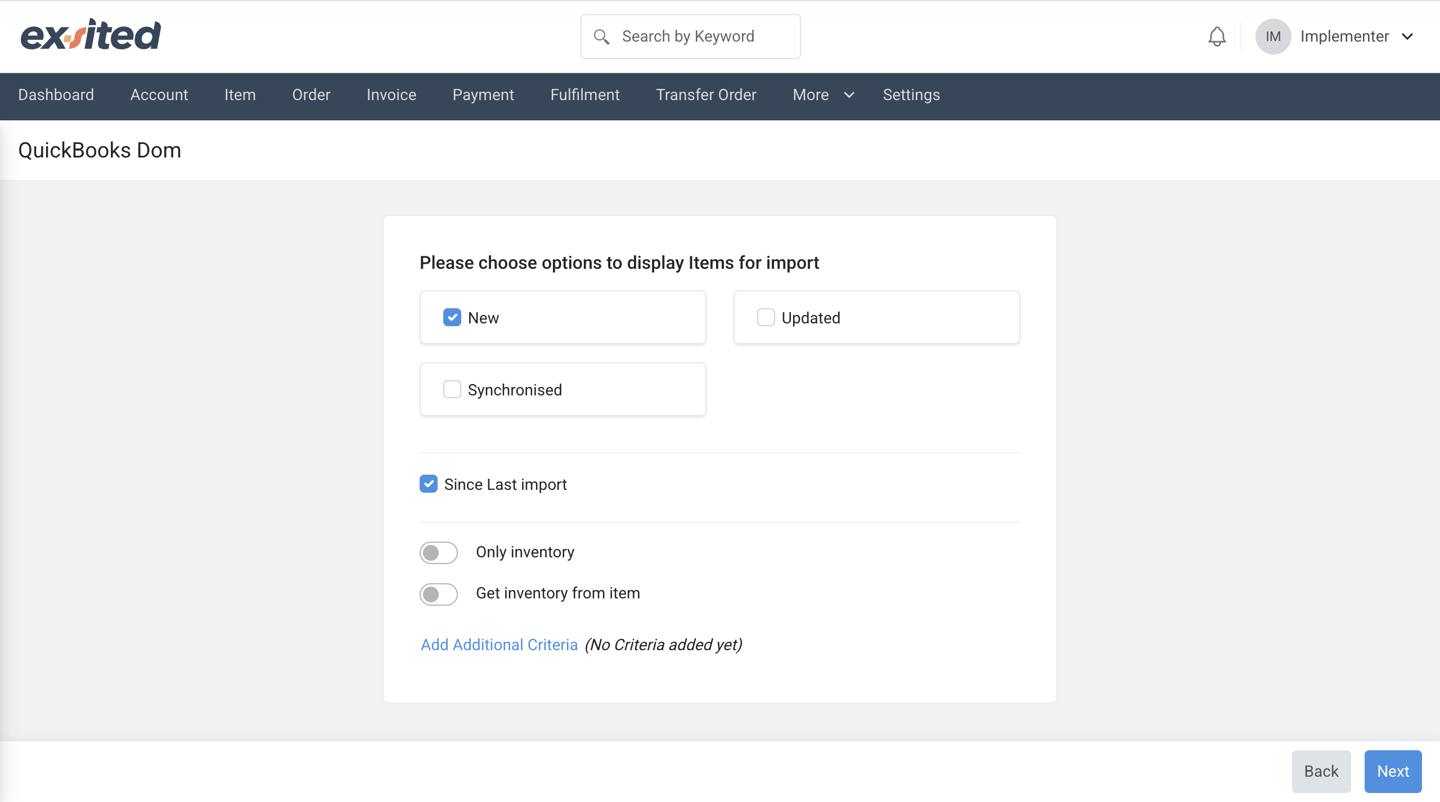
4. Click Synchronise
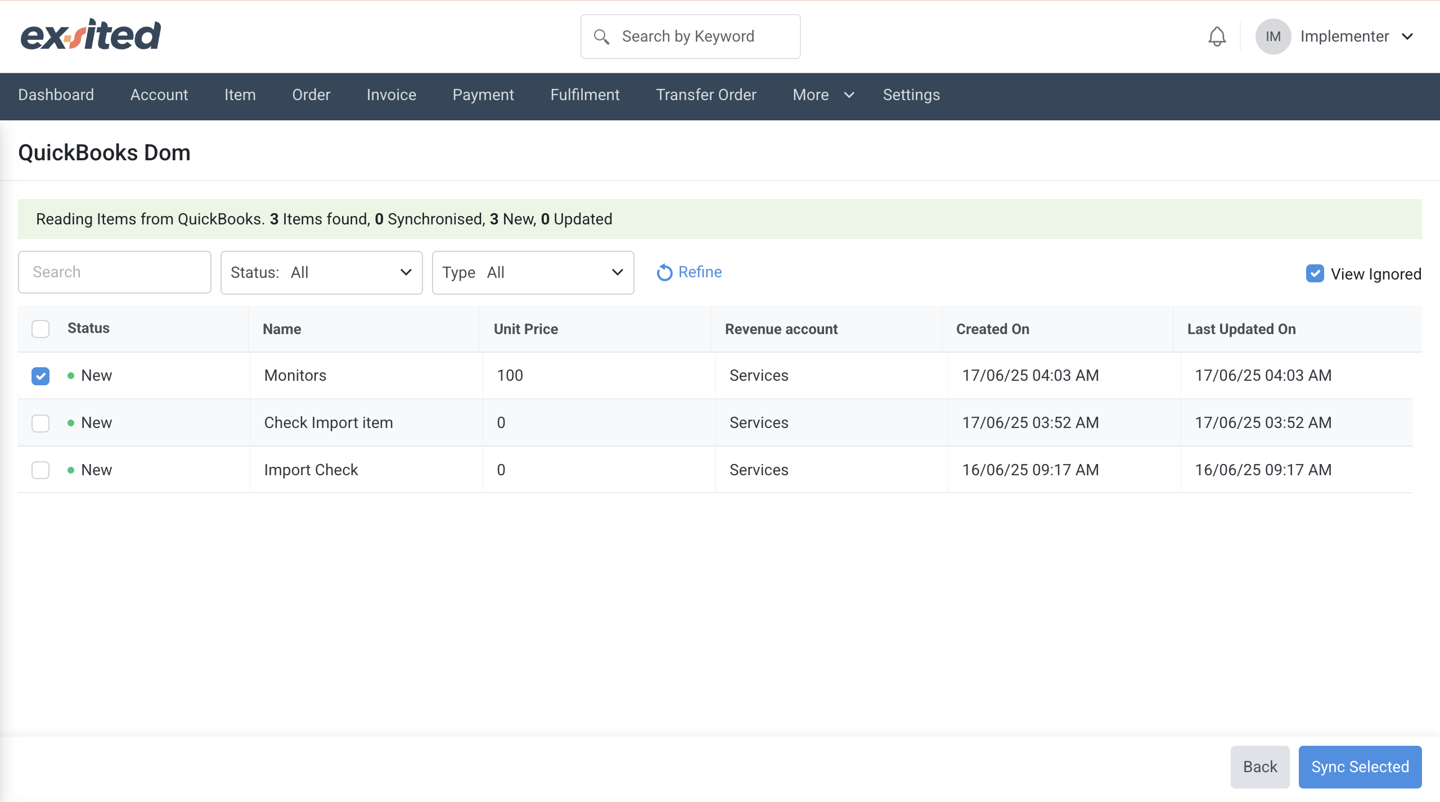
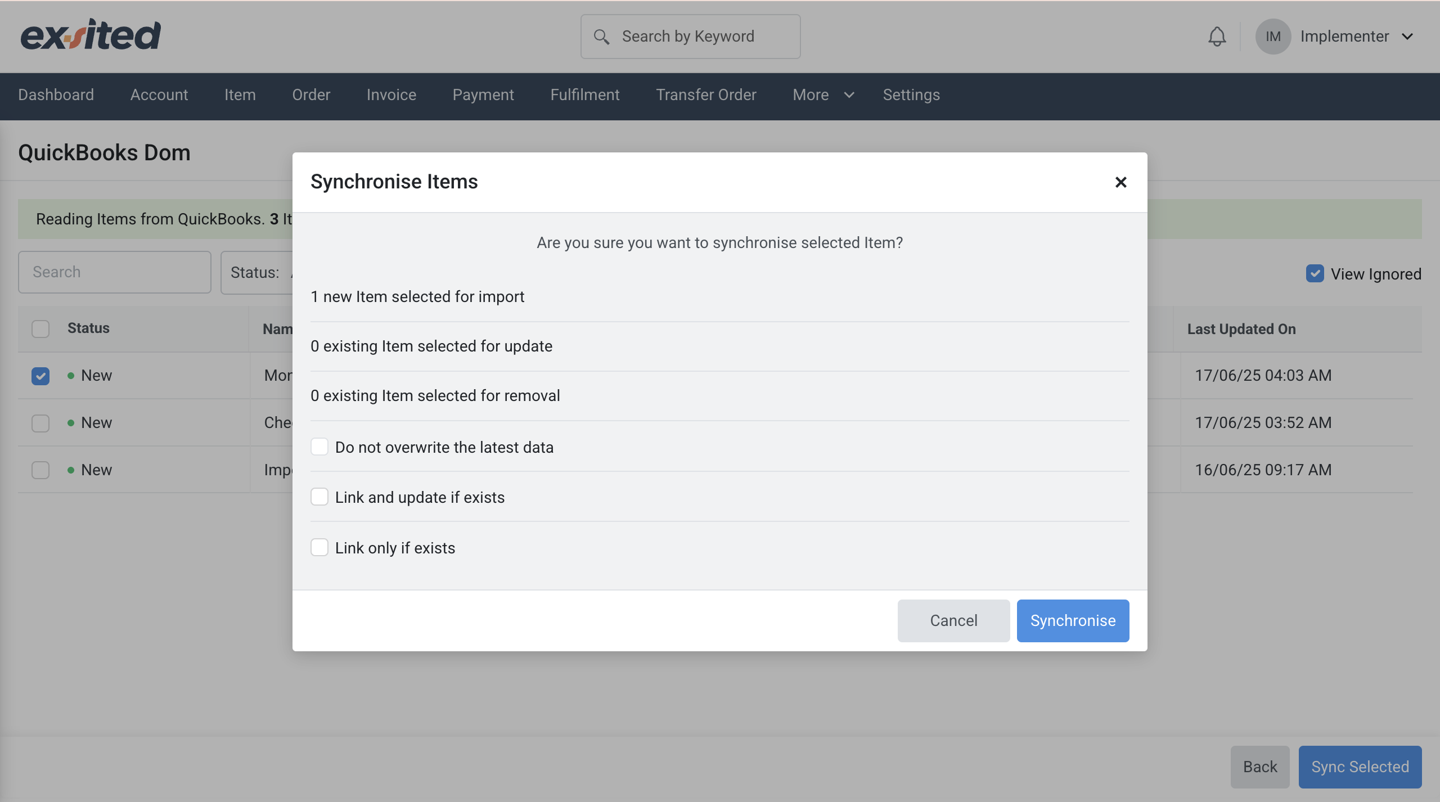
5. Review results under Exsited > Item
Export Items from Exsited to QuickBooks
Navigation: More > QuickBooks > Export Items
Important: Items and the warehouse must exist in QuickBooks before referencing in exported transactions.
Export screen allowing filtering and preview of items before syncing.
1. Select items to export
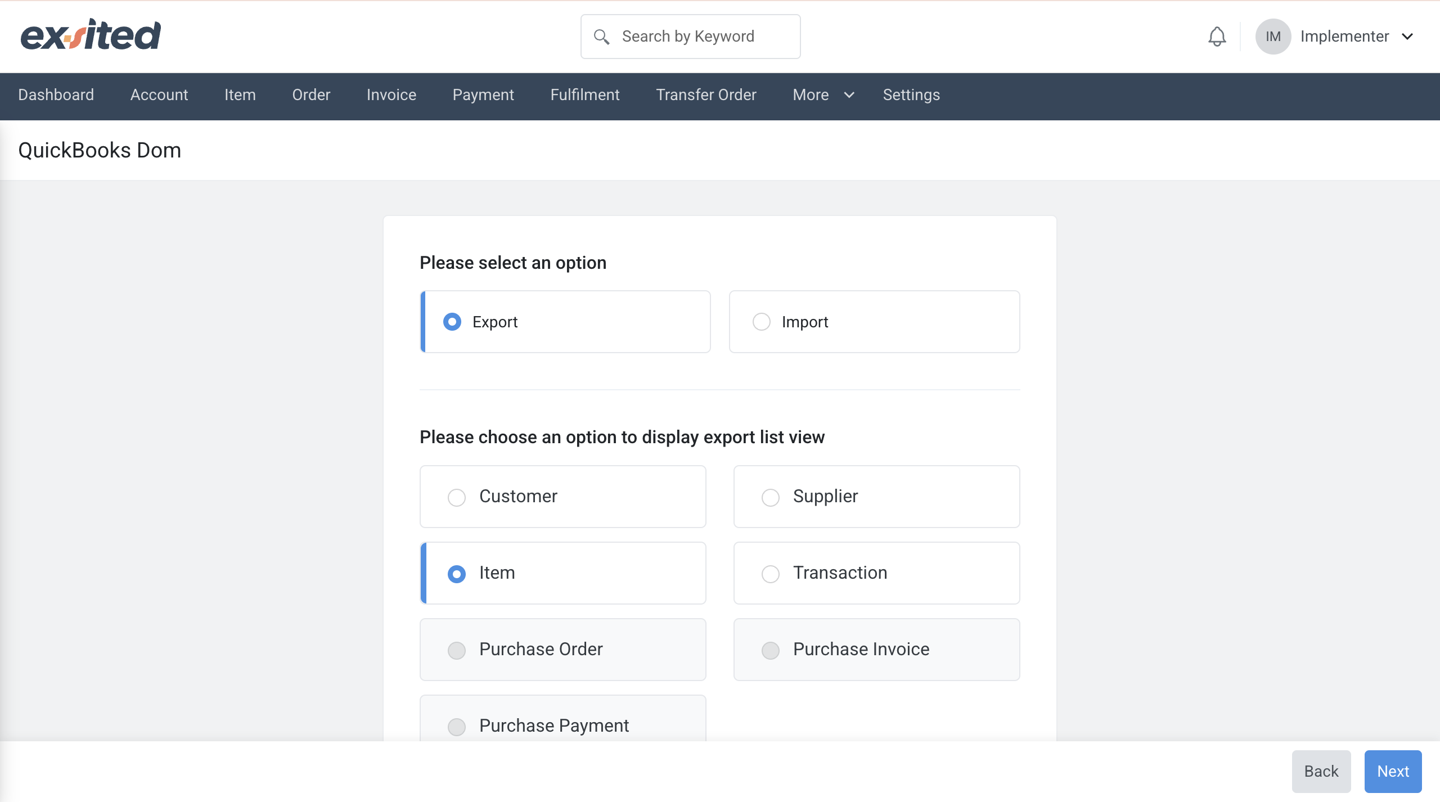
2. Filter by:
- New
- Updated
- Date range
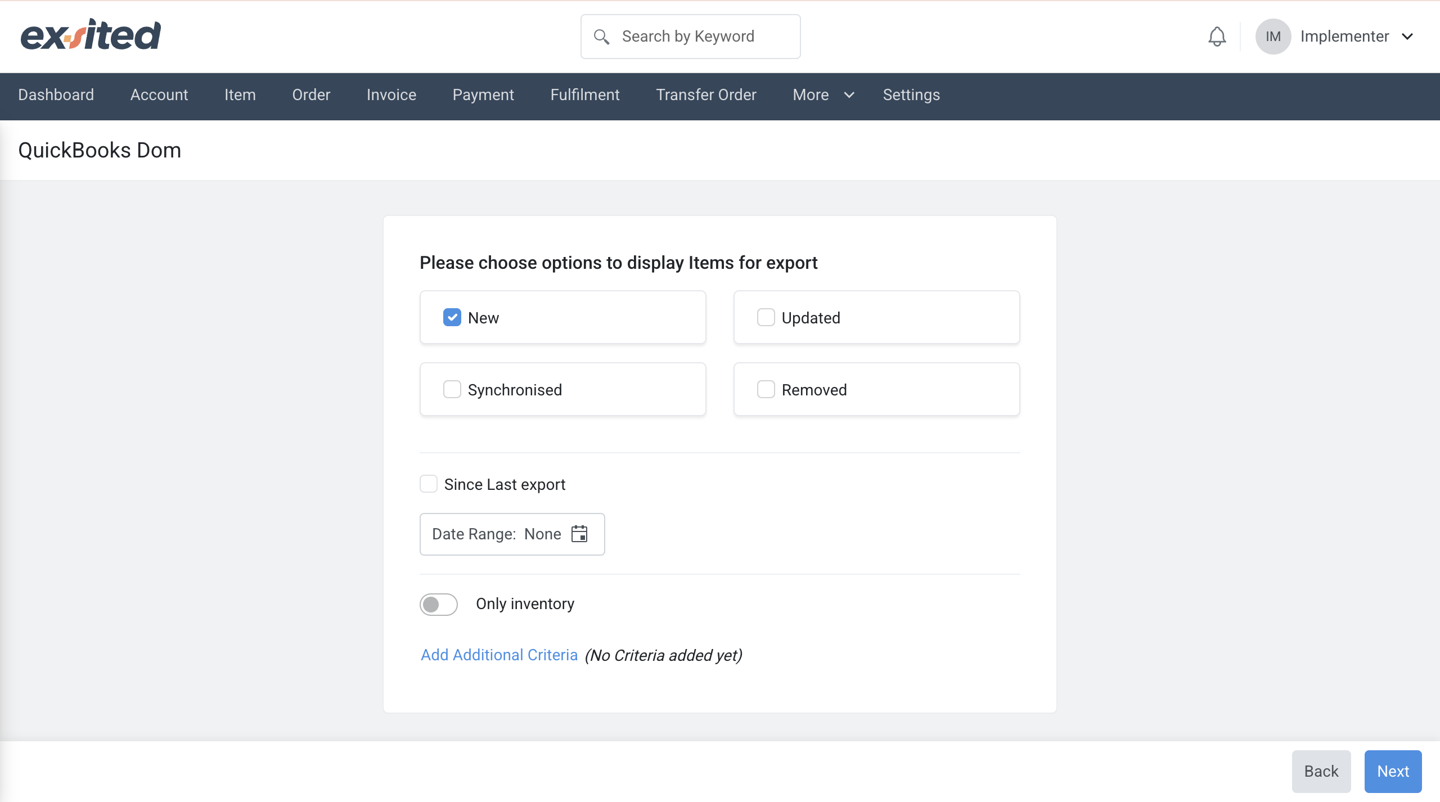
3. Confirm mapping for items
4. Synchronise
5. Review results under QuickBooks> Sales > Product and Service
Automation Setup
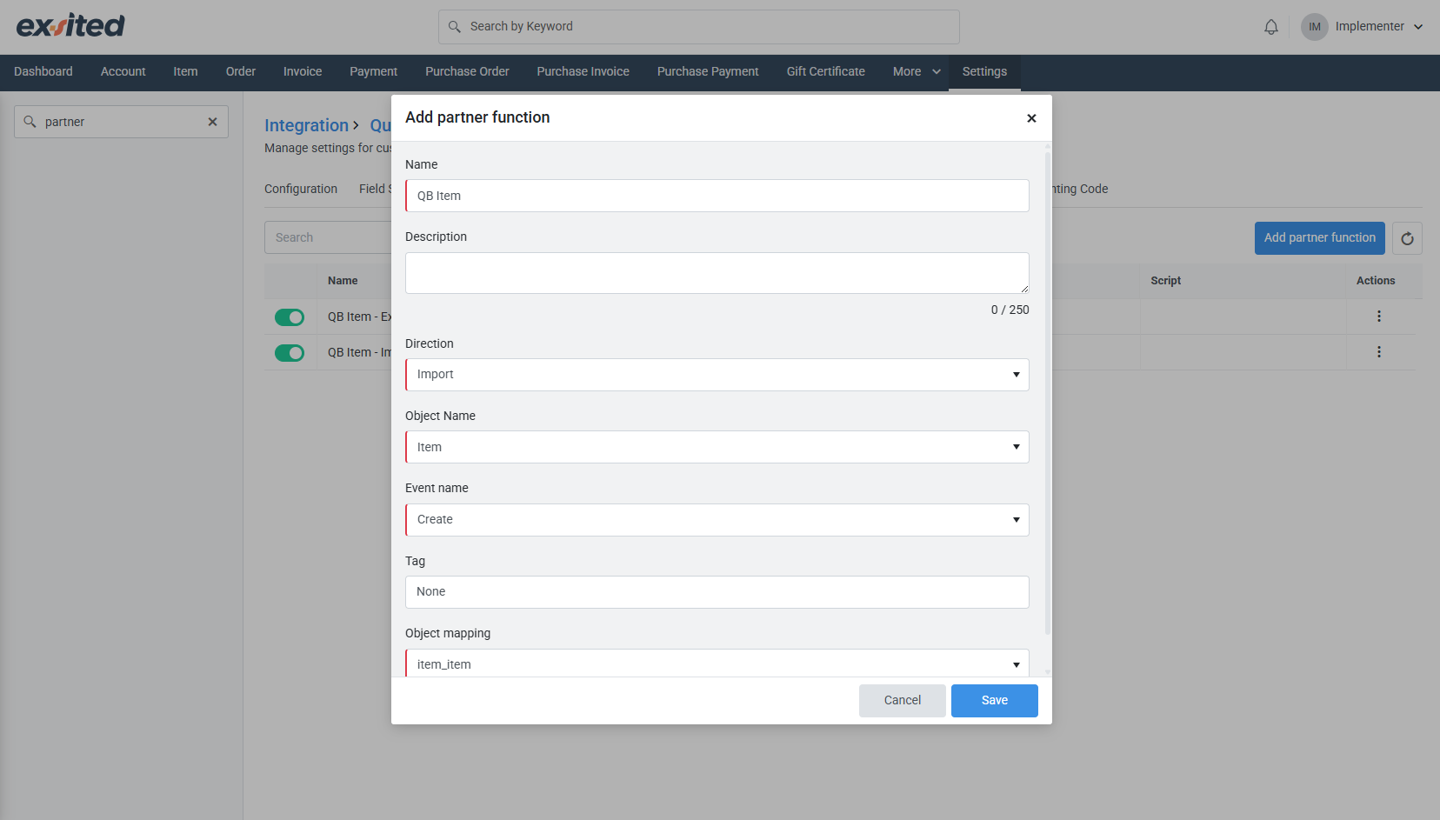
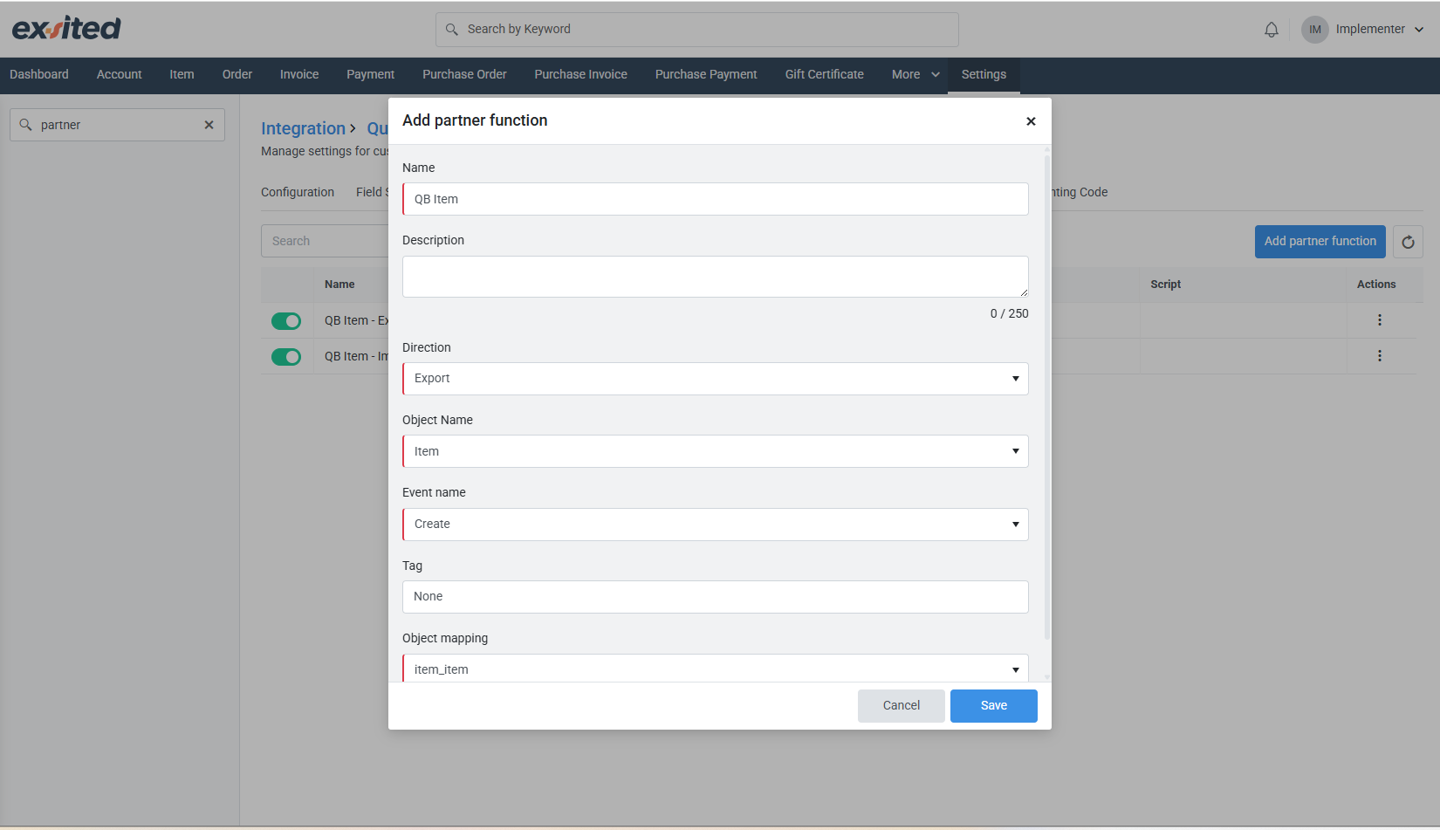
Create a Partner Function for Import and Export
Navigation: Settings > QuickBooks > Configuration > Partner Functions > Add Partner function
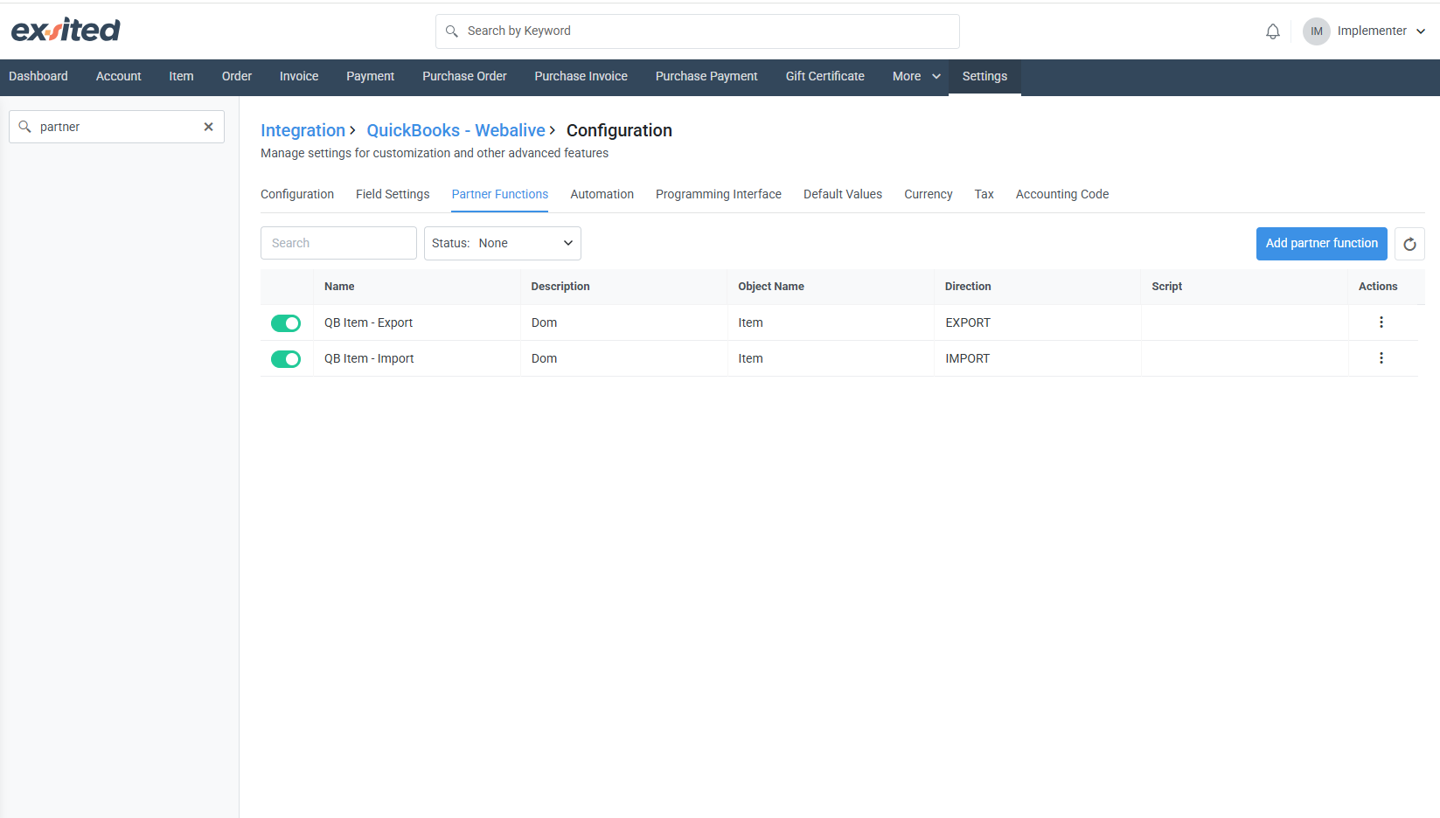
- Define:
- Direction: Import or Export
- Object: e.g., Customer, Invoice
- Event trigger: Create, Update
- Logic definition screen for integration rules between Exsited and QuickBooks.
- To automate importing data from QuickBooks into Exsited, a Partner Function needs to be defined with the direction set to Import and the appropriate object name (e.g., Item, Customer). This setup enables Exsited to continuously receive and process updated records from QuickBooks without manual intervention. The import automation ensures that the latest master data from QuickBooks is always synced and accessible within the Exsited platform.
- On the other hand, to automate exporting data from Exsited to QuickBooks, a separate Partner Function is configured with the direction set to Export. This allows real-time or scheduled export of records, such as items or invoices, directly from Exsited into QuickBooks. The export setup ensures financial data generated from operational workflows in Exsited is consistently pushed to QuickBooks for accounting and reporting purposes.
Automation setup for Import Process
Navigation: Settings > QuickBooks > Configuration > Automation
Choose one:
- Time-Based Automation – runs on schedule (e.g., hourly)
- Webhook-Based Automation – runs instantly when triggered
To automatically bring new data from QuickBooks into Exsited without manual effort, we set up an import automation rule. This setup is important because it ensures that newly created items (like products) in QuickBooks are always up to date in Exsited. Without automation, users would have to perform manual imports each time a change happens, which increases the risk of data mismatch or delays in business processes.
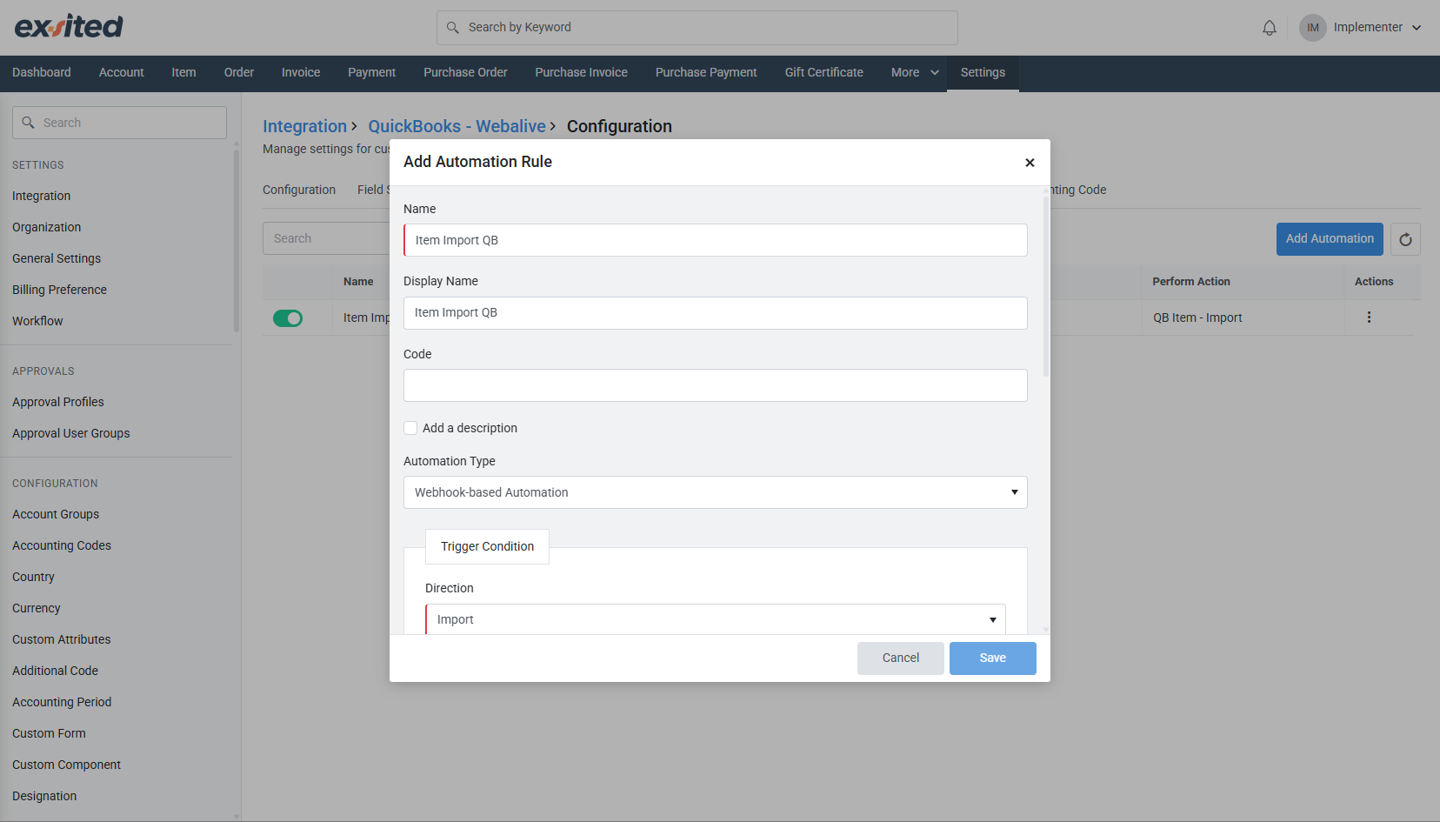
In this example, the automation rule is named "Item Import QB". The automation type selected is Webhook-based Automation, which means Exsited will automatically import data as soon as a new item is created in QuickBooks. Under the Trigger Condition, the direction is set to Import, it applies to QuickBooks - Item, and it triggers when the data is New. This means every time a new item is added in QuickBooks, it will be instantly synced into Exsited without any delay.

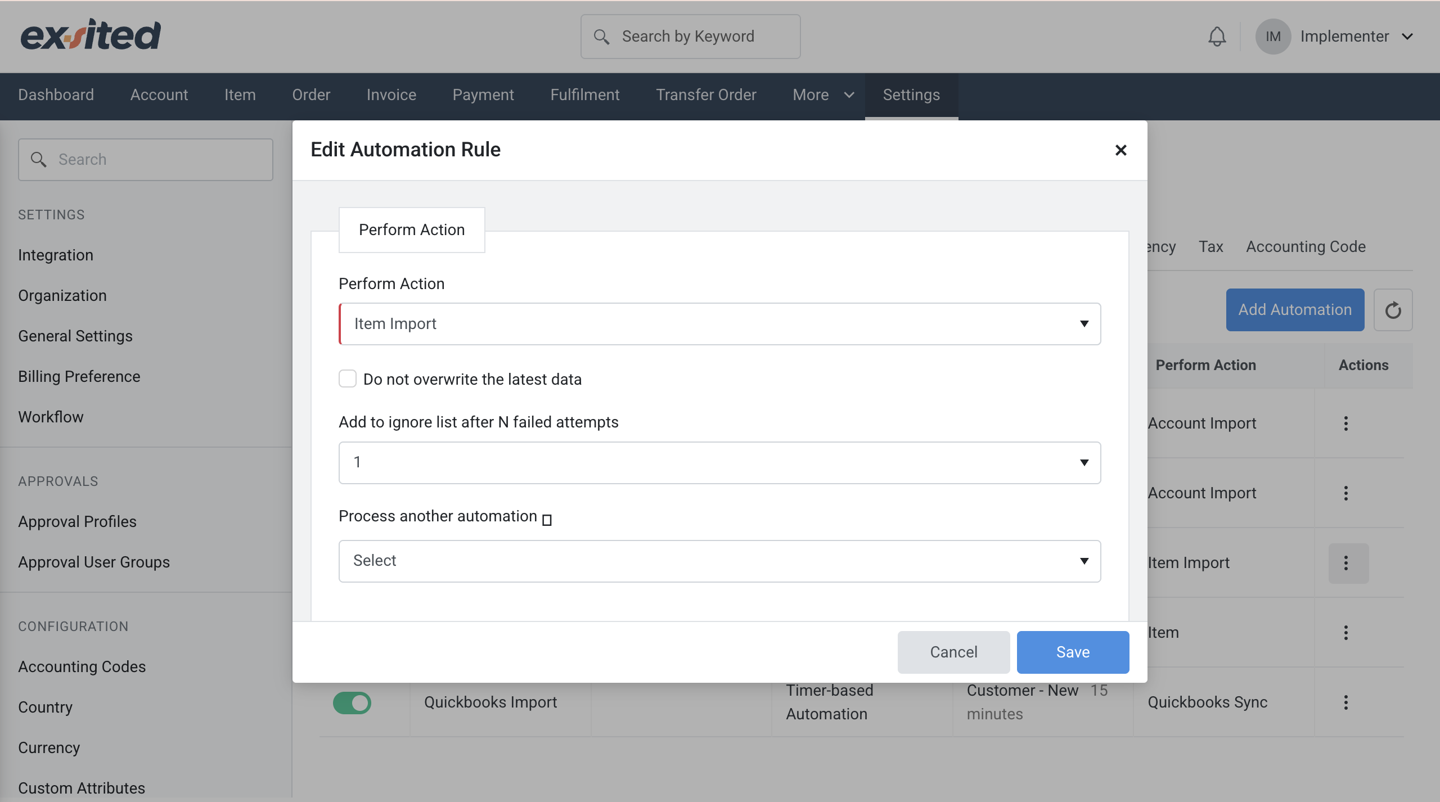
The Perform Action section defines what the system should do. Here, the action is QB Item - Import, which tells Exsited to bring in the item details. There are also helpful options like ignoring items after failed attempts or avoiding overwriting recent data. These controls help prevent system errors and protect the accuracy of your inventory records.
There are two ways to set up automation:
- Time-based automation runs on a schedule (for example, every 15 minutes or once per day). This is good if you want to sync regularly but don't need changes to appear instantly.
- Webhook-based automation happens in real-time Exsited listens for changes in QuickBooks and reacts immediately. This is ideal when you want your system to be updated instantly whenever something new is created in QuickBooks.
By using Webhook-based import automation, businesses reduce manual work, improve accuracy, and keep their inventory and financial systems aligned at all times.
Automation setup for Export Process
Add Custom Event for Export
Navigation: Settings > Events and Event Profiles > Custom Events
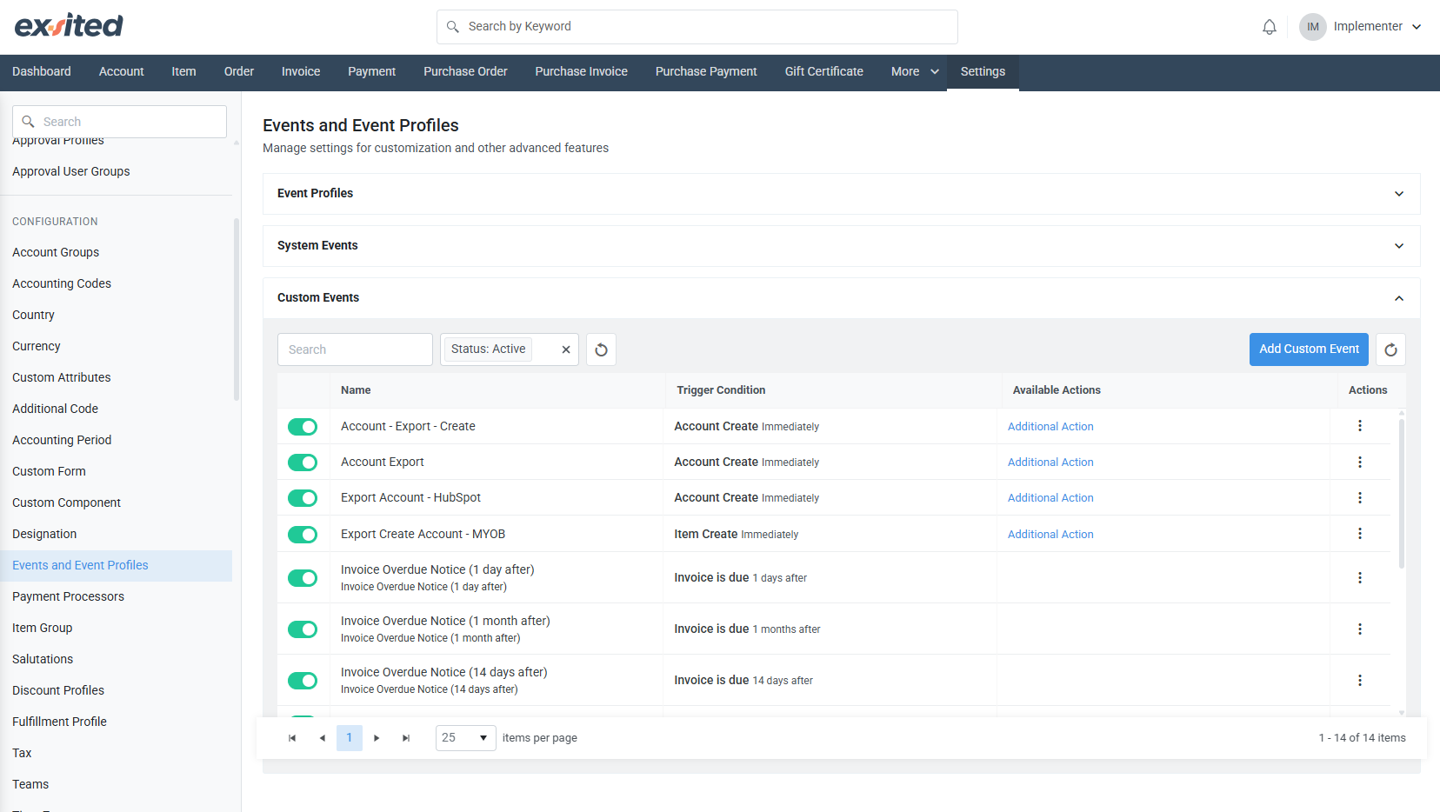
- Click Add Custom Event
- Configuration of triggers to start automated data exports.
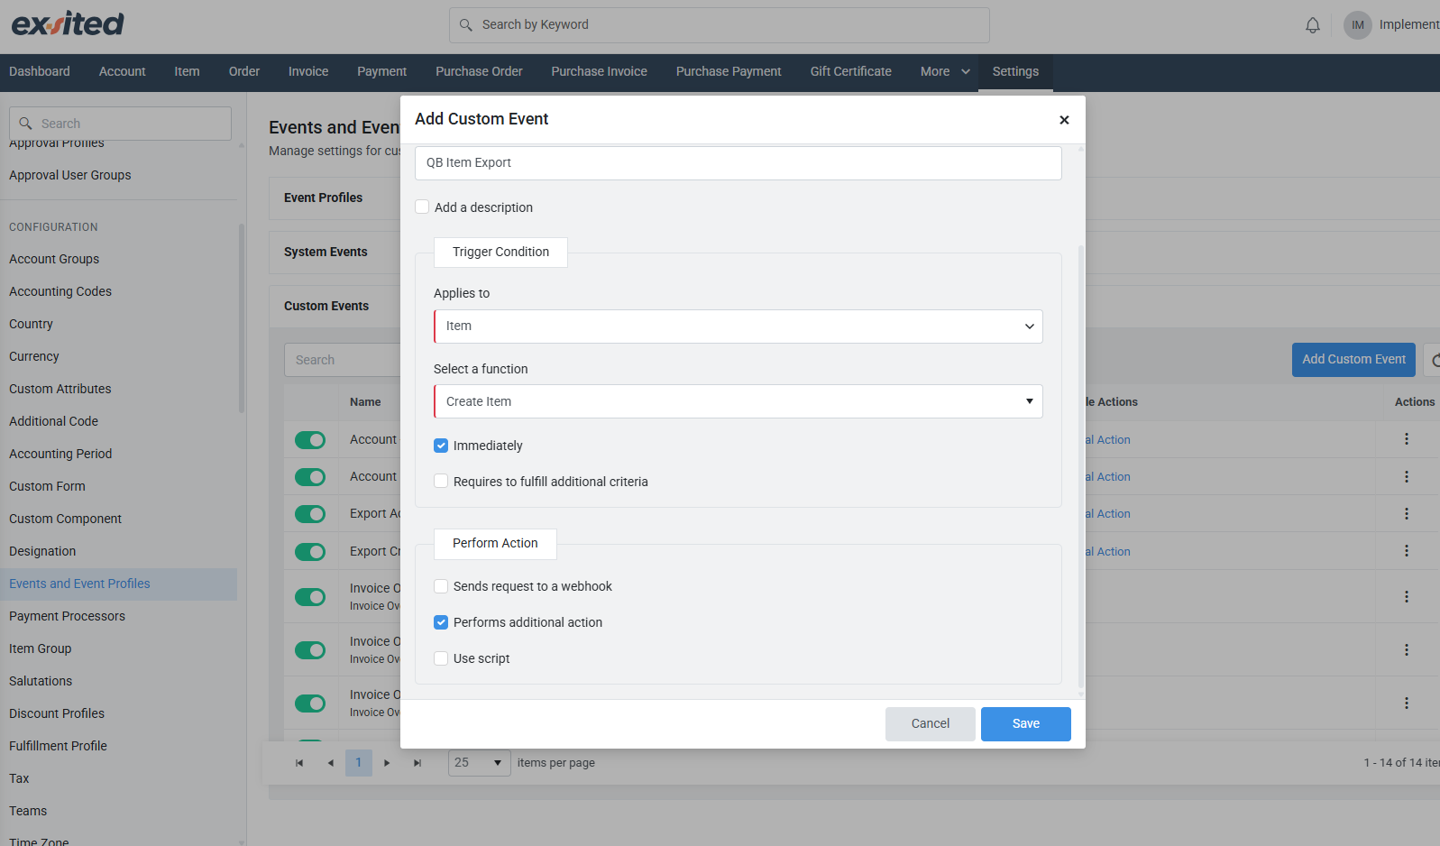
a) To automate the export of items from Exsited to QuickBooks, a Custom Event must be created. This event acts as a trigger that tells the system when to perform a specific action, such as exporting data based on defined system activity. The setup is essential for reducing manual work and ensuring that item updates in Exsited are reflected in QuickBooks without delays.
b) In the configuration screen, a Name and Display Name are defined for the event, for example, “QB Item Export.” The Applies to field is set to Item, which indicates that this automation rule will be triggered by item-related actions. You then choose a specific function, such as Create Item, which means the export will trigger whenever a new item is created in Exsited.
c) You also define the trigger timing and behaviour. In this example, the action is configured to execute immediately, meaning the export will be initiated as soon as the trigger occurs. The “Performs additional action” box is checked, which enables the system to carry out the export operation automatically. This ensures real-time data syncing without requiring the user to manually initiate an export every time.
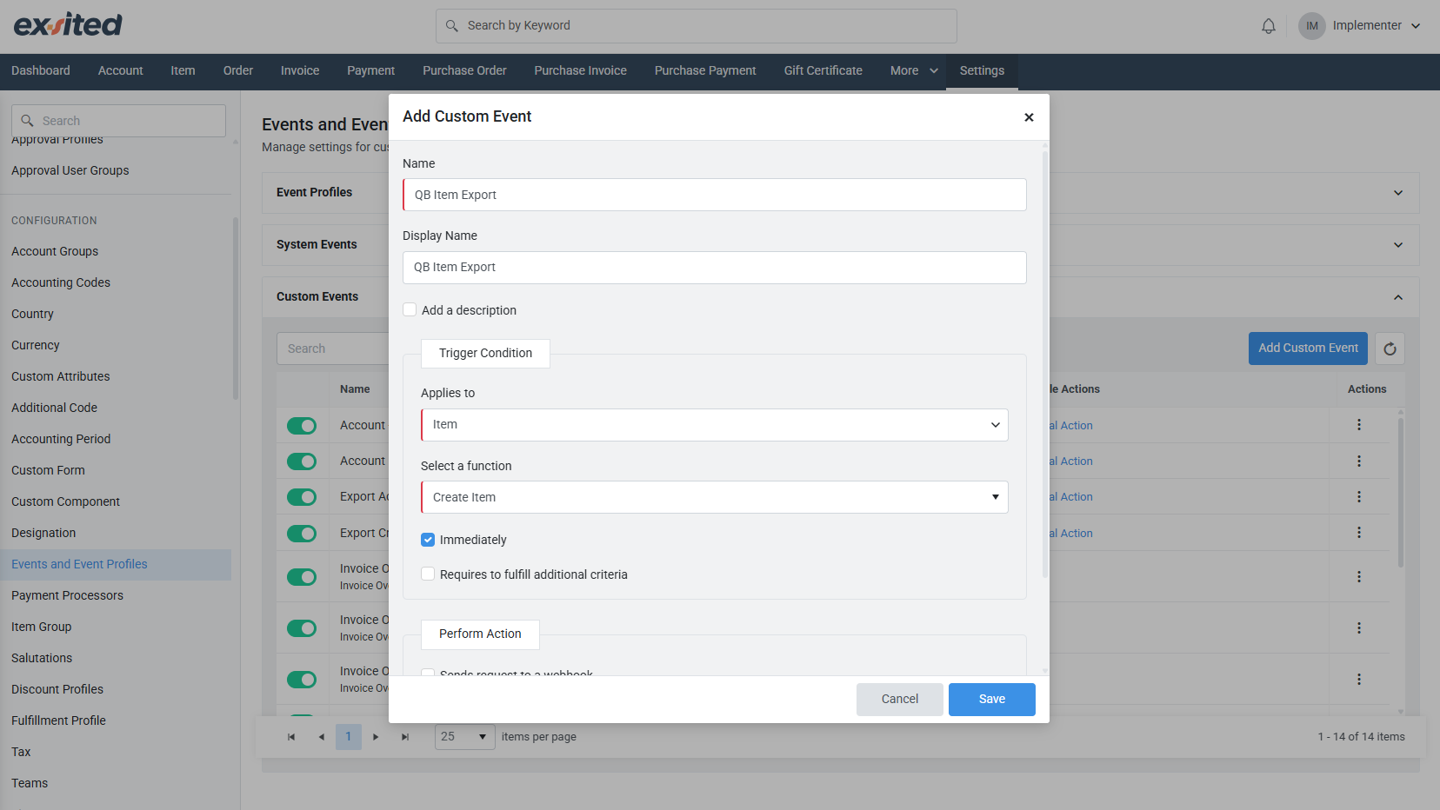
d) By setting up this Custom Event, businesses can maintain consistent and up-to-date product records across both platforms. It plays a vital role in eliminating data entry duplication and ensures that QuickBooks always contains the most current item information available in Exsited.
e) Click “Save”
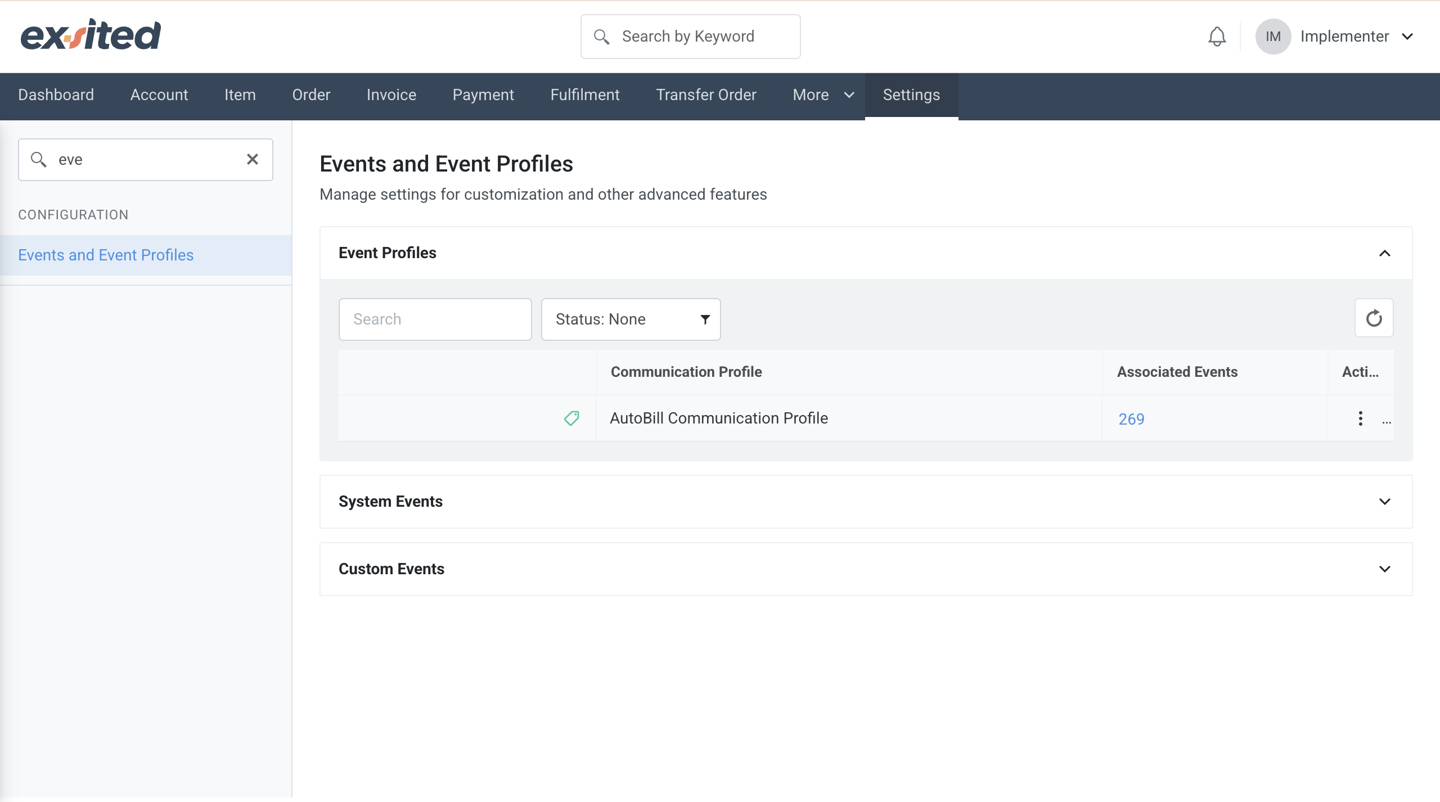
Add Event Profiles for Export
Navigation: Navigation: Settings > Events and Event Profile > Event Profile
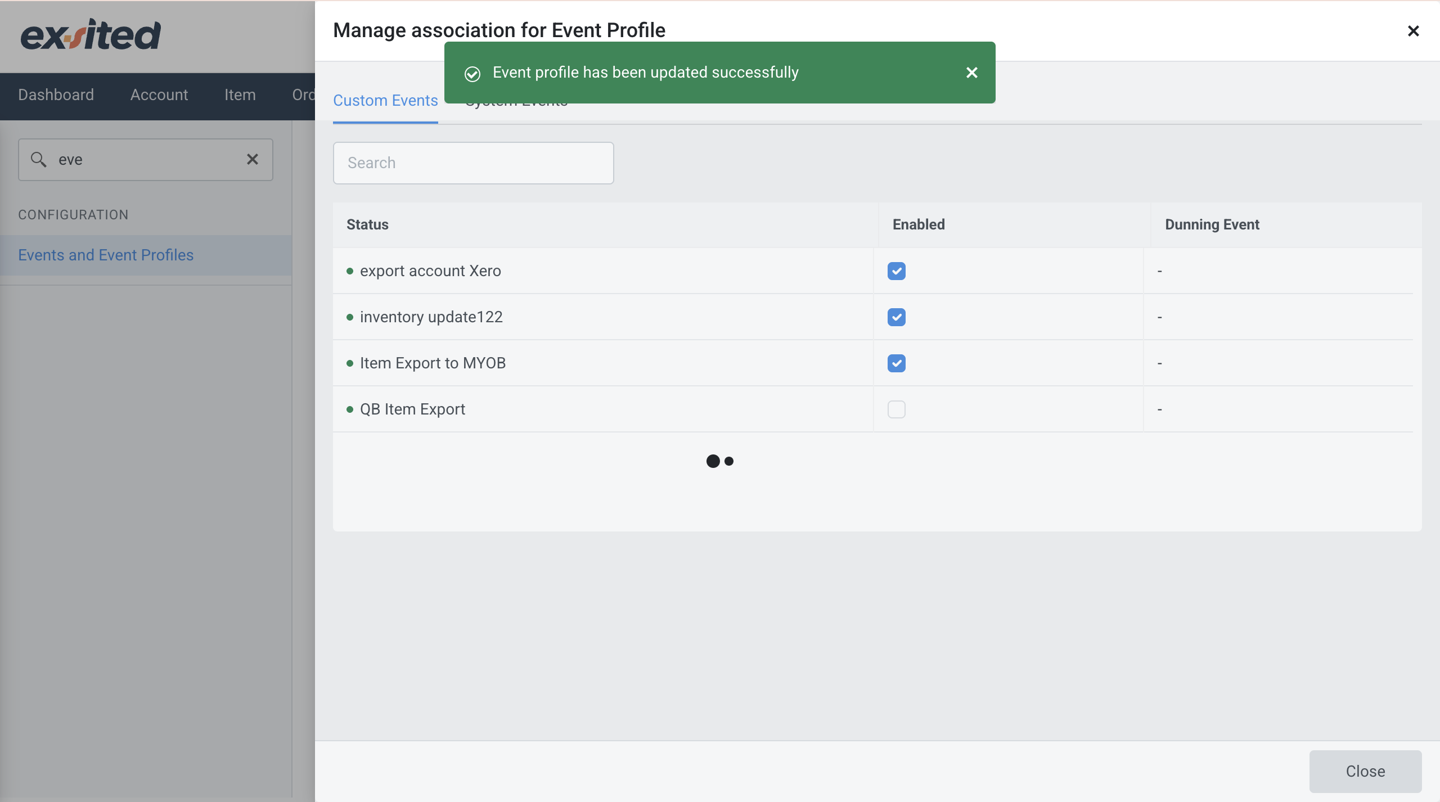
After selecting the profile, click on the number under the “Associated Events” column to manage linked events. In the Custom Events tab, you will see a list of all available events. Locate your custom event (e.g., "QB Item Export") and tick the Enabled checkbox to activate it. This step ensures the event will now respond to defined triggers such as item creation or updates, and perform the corresponding export actions.
When the event is enabled successfully, you will see a green confirmation message stating “Event profile has been updated successfully.” This confirms that the automation is now live and ready to operate. If the event remains disabled, no automation will occur even if the item trigger is met.
Enabling the custom event within an event profile is the final step to fully automate the export process. It connects the defined logic to the system’s operational workflow and ensures smooth, hands-free data synchronisation between Exsited and QuickBooks.
Transaction Configuration
Navigation: Exsited > Integrations > QuickBooks > Configuration
The transaction configuration screen in Exsited allows users to define default QB account codes and tax rates for invoice exports. It also supports mapping Exsited tax codes to QB tax rules to ensure accurate compliance during financial transactions.
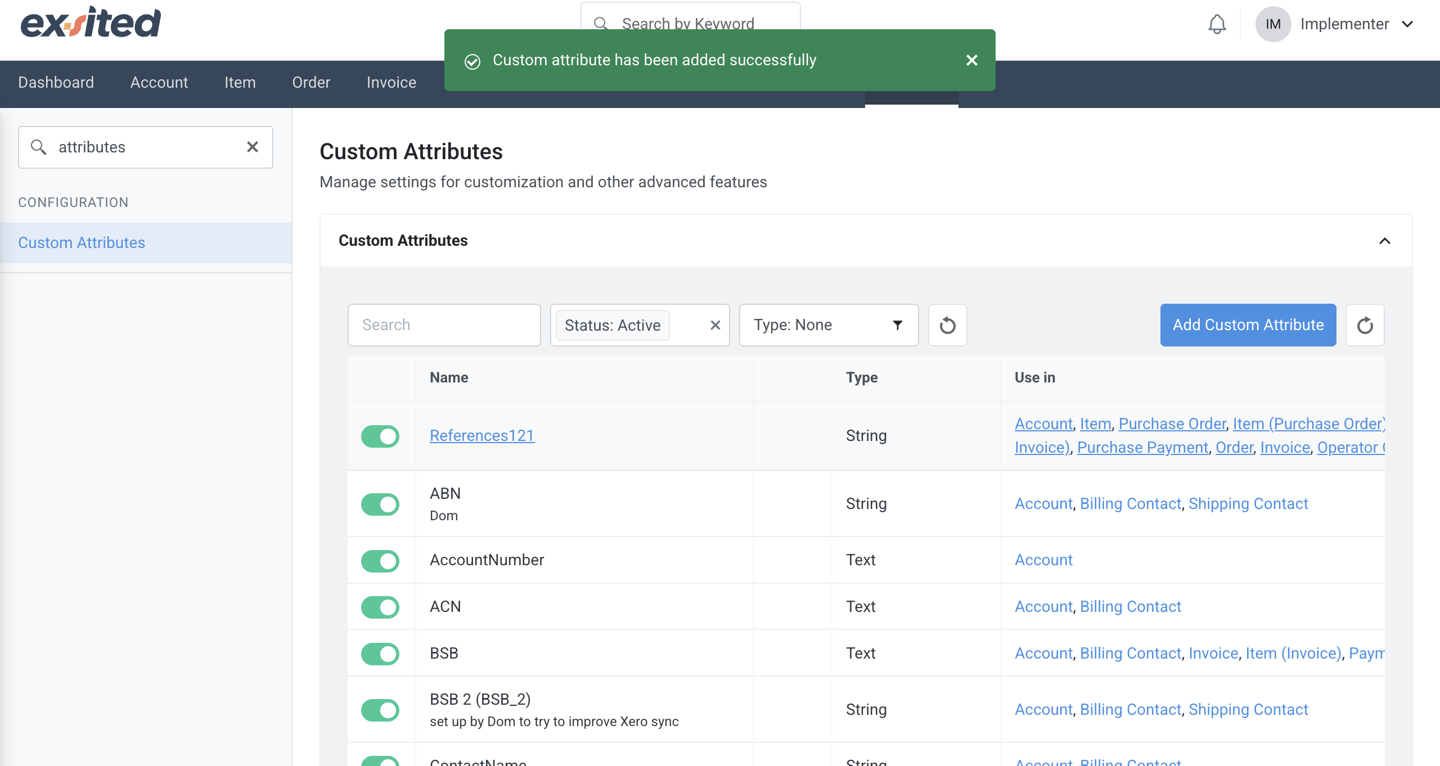
The Custom Attributes section in Exsited enables users to define additional fields, like references, to be used across modules such as invoices, payments, and credit notes. These attributes help align Exsited records with QB’s data requirements for successful integration.
Navigation: <mark data-renderer-mark="true" data-mark-type="annotation" data-mark-annotation-type="inlineComment" data-id="cace6abf-5950-463c-b458-465836c2b87c" data-mark-annotation-state="resolved" data-has-focus="false" data-is-hovered="false"></mark><mark data-renderer-mark="true" data-mark-type="annotation" data-mark-annotation-type="inlineComment" data-id="cace6abf-5950-463c-b458-465836c2b87c" data-mark-annotation-state="resolved" data-has-focus="false" data-is-hovered="false"></mark>Settings > Configuration > Custom Attributes
To ensure accurate data mapping between Exsited and QB, it's important to define customer reference fields. In Exsited, this is done by creating Customer Attributes.
QB uses customer references (such as contact names or unique IDs) to identify and manage customers. However, Exsited does not have these references by default. To align both systems, you need to manually create custom customer attributes in Exsited that match the reference format used in QB.
This allows for:
- Proper linking of customer records during import/export
- Error-free syncing of customer-related data (e.g., invoices, sales orders)
- Improved integration accuracy and traceability
By setting up custom attributes in Exsited that mirror QB’s customer references, you establish a consistent and reliable mapping between the two platforms.
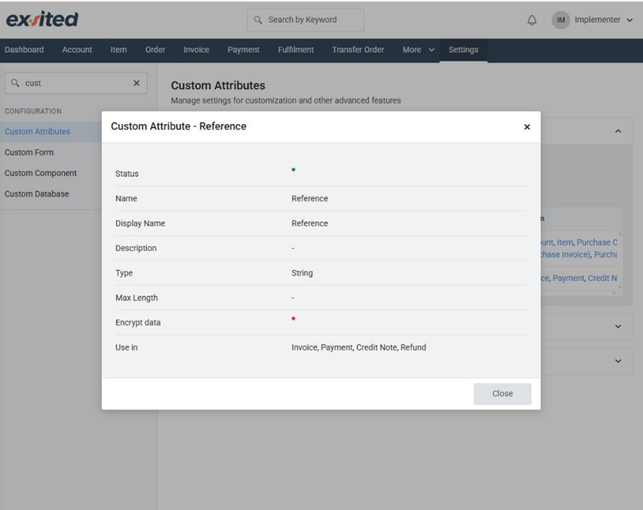
To support the export process in Exsited, custom attributes such as "Reference" should be added and mapped to QB fields. This ensures that essential identifiers are included during invoice, payment, and credit note exports for accurate data synchronisation.
This mapping ensures that data fields such as customer names, item codes, invoice numbers, and tax details match correctly across both systems.
Once the field mapping is completed, you will be able to successfully export and import transactions, including invoices, between Exsited and QB.
These integration processes can then be automated by using the Partner Function and Automation settings, allowing for seamless and real-time data synchronisation without manual effort.
Final Test & Validation
- Run manual imports/exports first
- Confirm item links and invoices are correctly synced
- Enable automation after validation
Best Practices
- Always test with a small sample before enabling full sync
- Maintain a backup of critical financial data
- Regularly review account and tax code mapping
- Monitor sync logs for errors or mismatches